Showing posts with label Techniques and Tutorials. Show all posts

Monday, May 6, 2019

How to Draft a Motif in Diversified Plain Weave

My study group, Exploring More, is looking at drafting a motif in different weave structures, the first was Huck Lace, and the second was Summer and Winter.  The third is Diversified Plain Weave and I am going to take you through how I drafted a pattern.

I am going to use the new method for weaving Diversified Plain Weave, which is uses less shafts and has an easier treadling method.

First thing is to choose a motif; I am going to use the same angelfish from the previous two posts.
Next is the threading; looking at the angelfish motif there is vertical symmetry so again the threading will be in point order (i.e. in a V shape).  Use the threading blocks for the new Diversified Plain Weave which are Block A 123 Block B 124 Block C 125 etc.  The tabby shafts 1 and 2 are in a thinner grist than the pattern shafts.  I used an orange colour to highlight them.

The old Diversified Plain Weave threading blocks are Block A 232141 Block B 252161 etc.  There are two pattern shafts required for each block with the old style.  So by using the new Diversified Plain Weave threading blocks more pattern is created using fewer shafts.
The basic tie up for the new Diversified Plain Weave is to have the first two treadles be tabby shafts versus the pattern shafts.  The pattern shafts then all have shaft 1 added to them.

The old Diversified Plain Weave tie up had the first two treadles as plain weave as opposites.  And the pattern shafts also had plain weave on opposites along the bottom of the treadles.  This created little squares of plain weave with the thinner tabby threads and the overall fabric had a basket weave affect.
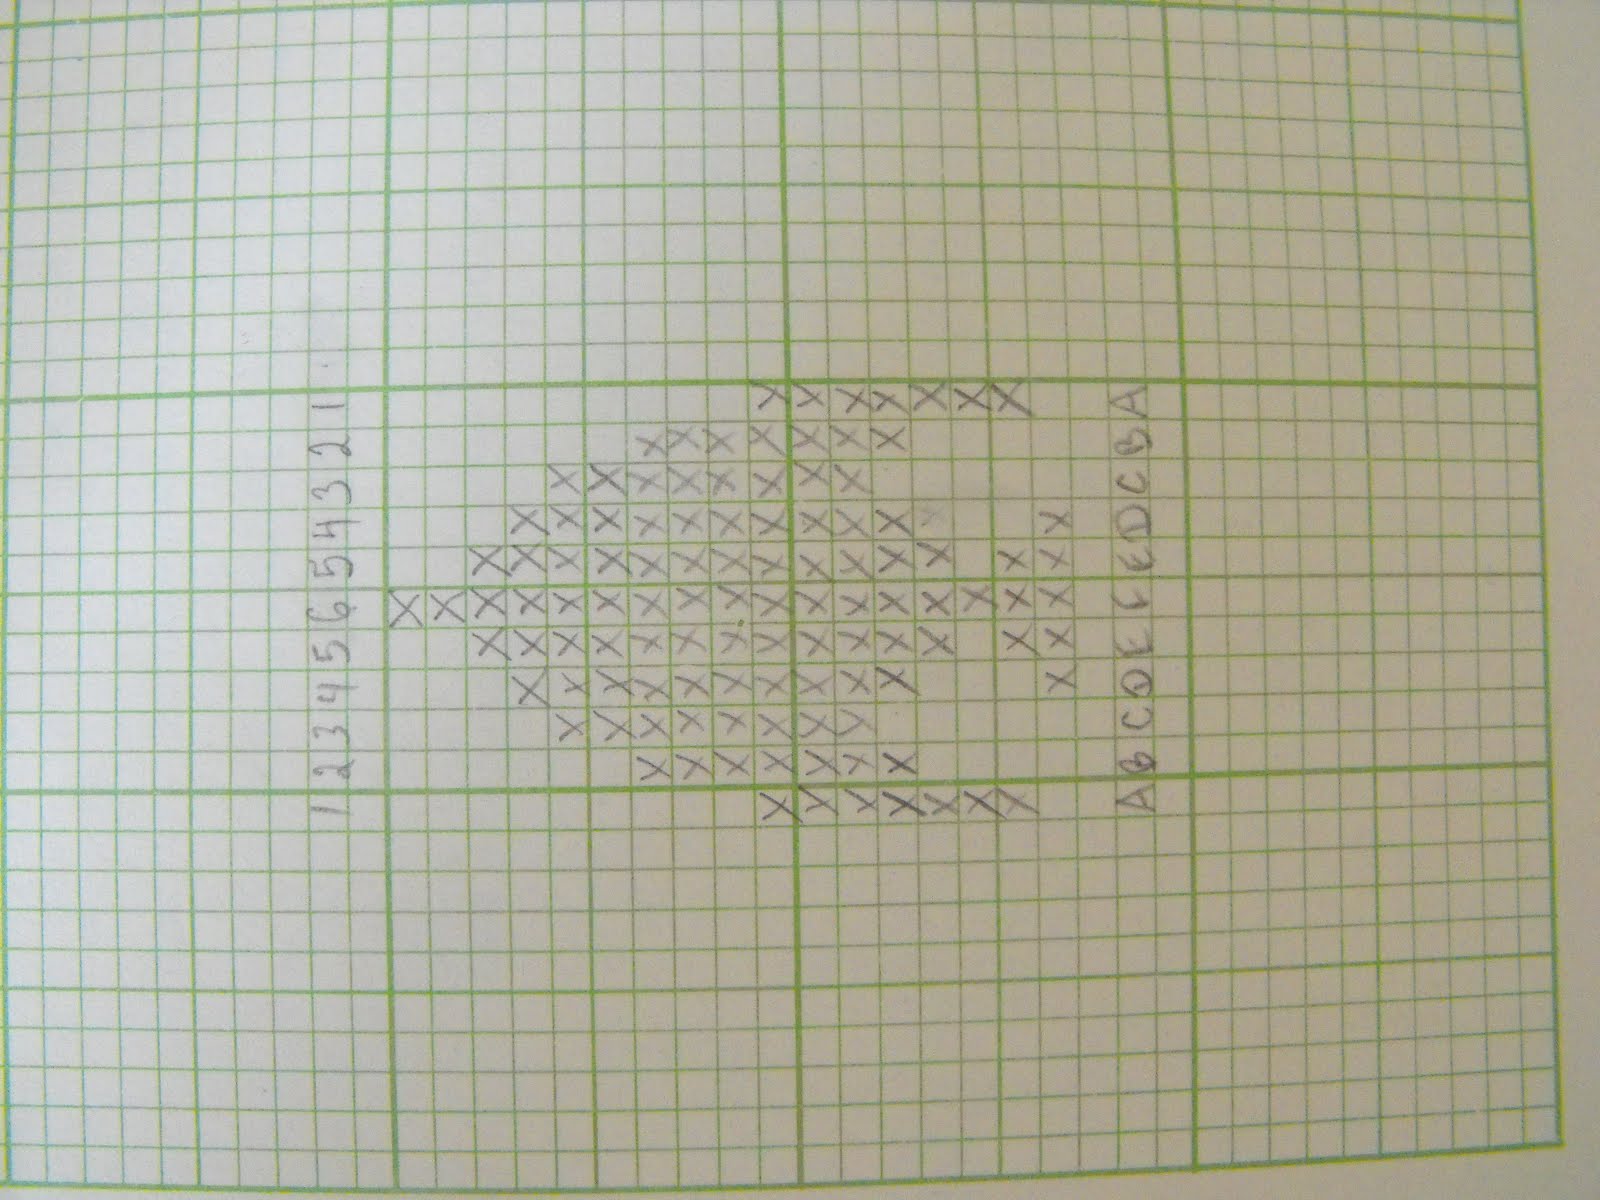
Now for the tie up, just take the graph of the angelfish and place on its side with the top of the motif facing to the left, just like for Summer and Winter.  Just use the angelfish motif to create the pattern from number 6 down to 1.
Now add the pattern shafts to the basic set up.  You will notice that the tie up is quite similar to Summer and Winter, although without the ‘pairs’ of pattern treadles.
For the treadling I look back at the angelfish graph and can see that each treadle corresponds to a single unit, there is no symmetry.  I will place the pattern treadles in straight order (in a straight line).  The treadling block for the new Diversified Plain Weave is Block A 123 Block B 124 Block C 125 etc.

The old Diversified Plain Weave treadling blocks were Block A 232 Block B 141 Block C 252 etc.  While weaving it could be very easy to lose track of which tabby you were using.
The finished angelfish is 9 Shafts and 12 Treadles.  There is a lot of playing around that you can do with Diversified Plain Weave, for example how big of a difference between the grists of the pattern and tabby threads do you want or do you want to highlight the thinner tabby lines or do you want to hide them?  Below I thickened the pattern threads in the warp and weft. 
So that’s a small guide to how to design a motif in Diversified Plain Weave.  For more information about the new versus old types of Diversified Plain Weave go to Weavers Issue 36 Summer 1997, the article is called Thick ‘n Thin Again by Madelyn van der Hoogt.

Monday, April 22, 2019

How to Draft a Motif in Summer and Winter

My study group, Exploring More, is looking at drafting a motif using different weave structures, the first weave structure was Huck Lace and here is the post.  The second weave structure we looked at was Summer and Winter and I am going to take you through how I drafted a pattern.

First thing is to choose a motif; I am going to use the same angelfish from the Huck Lace.  Please just click on the photos and it will make them larger.
Looking at the angelfish motif there is vertical symmetry so again the threading will be in point order (i.e. in a V shape).  Use the standard Summer and Winter threading blocks which are Block A 1323 Block B 1424 Block C 1525 etc.
Now for the tie up, which is quite easy, just take the graph of the angelfish and place on its side with the top of the motif facing to the left.
Summer and Winter is quite greedy for treadles.  You have probably heard of ‘in pairs’ in reference to Summer and Winter that is because there needs to be two treadles for each pattern pick.  One treadle has Shaft 1 on it (P1) and the other treadle has Shaft 2 on it (P2), but they both have the same pattern treadles.  Here is a basic set up; it just needs the pattern to be added.
I’ve added the pattern from the graph; every pattern has two treadles, a P1 and a P2.  Shaft 3 is left blank because it is the shaft that is used to separate the motifs.  I also left treadle 3 and 4 blank as they are the breaks between the motifs in the treadling.
Here is the treading and tie up together.
What makes Summer and Winter special is that there are different treadlings variations; Singles (also known as non pairs), Pairs (there is two different types; X’s and O’s), and Dukagang (also known Overshot).  To treadle my angelfish I look back at the angelfish graph and can see that each treadle corresponds to a single unit, there is no symmetry.  I will place the treadles in straight order (in a straight line) and in one of the Summer and Winter treadling variations, which I will explain with each example.

The first is Singles which is tabby 1 P1 tabby 2 P2 and gives a brick like pattern.  As is standard for Summer and Winter I’ve put the tabby in with a finer grist and in the same colour as the warp. This really keeps the shape of the angelfish.
Next variation is Pairs X’s the treadling repeat is tabby 1 P2 tabby 2 P1 tabby 1 P1 tabby 2 P2. The anglefish almost look like rockets now.
Next is Pairs O’s also known as bird’s eye.  The treadling repeat is tabby 1 P1 tabby 2 P2 tabby 1 P2 tabby 2 P1.  The tail of the angelfish are very well defined in this method.
Last variation is Dukagang.  The treadling repeat is tabby 1 P1 tabby 2 P1 tabby 1 P1 tabby 2 P1.  It uses the least amount of treadles, from 22 down to 12. This is the most columnar of them all.
So that’s how to draft a motif in Summer and Winter.  If you would like to know more about drafting I recommend The complete Book of Drafting for Handweavers by Madelyn van der Hoogt.

Monday, April 8, 2019

How to Draft a Motif in Huck Lace

For the first half of the year in my Guilds study group, Exploring More, the topic was taking a motif and drafting it in various weave structures.  The first weave structure that we did was Lace, and I am going to take you through how I drafted a pattern.

We choose to do a Lace Weave first because it has clearly defined blocks and has a relatively large number of pattern shafts.  I chose to do a Huck Lace because I like the look of the interlacements.
The first thing is to choose a motif.  I chose something that has symmetry, so I can have a larger image using less pattern shafts.  Let’s try this cute angel fish.
For Huck Lace the first two shafts are the background shafts, they don’t affect the pattern.  But the rest of the shafts are pattern shafts.  In my case I have a 12 shaft loom so minus the two background shafts I have 10 pattern shafts.  For my fish I only need six pattern shafts so I have plenty of shafts.
So, now is the time to get out the Huck Lace graph paper.  You have probably seen in the back of Lace weaving books or Drafting books.  This sample is from The Complete Book of Drafting for Handweavers by Madelyn van der Hoogt.  I actually find it too small to use and I only need a small portion to use for my motif.  So I make my own when I graph the image.
For a motif you are going to thread the blocks in either straight order (i.e. in a straight line) or point order (i.e. in a V shape), with the fish I will be using point order because I have horizontal symmetry and it cuts down on the number of shafts needed.  Use the standard Huck Lace threading blocks which are Block A is 23232 Block B is 14141 Block C is 25252 etc.
Now is the time to add the hash marks into the graph.  The hash marks alternate between |, which are warp floats and the –, which are weft floats.  I wanted the nose of the fish to be a warp float Huck Lace unit so I started with the | hashing there and worked back across the line.  Then I add the rest of the hash marks to the graph.  The hashing alternated between EO (even odd) and OE (odd even).
To figure out the tie up a new graph is needed.  This new graph is set up in alternating plain weave.  This is where the EO (even odd) and OE (odd even) stuff comes into play.  My first line on the fish graph is EO so I start with the odd number plain weave line.
To fill in the new graph I look across at the fish graph and look at the purple highlighted areas.  On the fish graph I have numbers 3-8 running on the top of the graph these are the shaft numbers.

If the highlighted area has a |, that shaft number is added to the new graph, which created a warp float unit.  If the highlighted area has a  –, the shaft number is subtracted from the new graph, which creates a weft float unit.
Looking at the first line the highlighted area is a | and on shaft 8 so it gets added to the new graph.  The second line the highlighted area is a – and on shaft 8 so it gets removed from the new graph.  Continue adding and subtracting until done.  This is now the tie up, instead of reading it from the bottom up, read it from the right to the left.
For the treadling I look back at the fish graph and can see that each treadle corresponds to a single unit, there is no symmetry.  I will place the treadles in straight order (in a straight line) in the Huck Lace manner, which is the same as the threading blocks, Block A is 23232, Block B is 14141 etc.  I now have all the information that I need to weave the fish, I don’t need to put it into a weaving program.  But I will so you can see the final product!
There are some duplicate treadles that I can take out, down to 15 treadles from 19.  But there is still too many treadles needed from my loom.
If I take out the alternating huck lace units I can get down to 10 treadles but I think that the fish looks funny.  If I was going to weave this fish I think that I would add back the alternating huck units and just have the nose as a duplicate and that would get me down to 14 treadles, which is what I have on my loom.  Of course this isn't a consideration if you used a table loom!
So there you go a small guide to drafting a motif in huck lace!  If you would like to know more about drafting I recommend The Complete Book of Drafting for Handweavers by Madelyn van der Hoogt.

Saturday, April 8, 2017

All About Shuttles

Today I gave a short presentation to my guild at our monthly meeting about shuttles and I thought I'd share it with you.

One common definition of a ‘weaving shuttle’ is that it is an appliance which holds the weft, and which can be passed or thrown through the shed in the warp.  These are a few from my collection.

Stick or Poke Shuttle
 The simplest shuttle is a flat stick that has a notch at each end.  It can be passed through the shed but cannot be thrown.
Loading the stick shuttle begins with a slip knot looped over a notch the yarn is built up in figure eights alternating sides after every few passes.  This builds the weft up outwardly to minimize the drag of the shuttle going through the shed. The weft must be unwound by hand every pick and care must be taken to unwind enough yarn to pass through the shed without tugging on the selvedges.
The middle two stick shuttles have a tapered edge on one side.  The edge can be used to beat the weft into the web.

Rag Shuttle
The rag shuttle has two flat sides and pointed ends. These sturdy shuttles have traditionally been used for rags although they are excellent for heavy rug yarns and chenille.  They must be unwound by hand every pick.  There are two distinct styles of rag shuttle, open bottomed and closed bottomed, but both styles have sides high enough for all the yarn to pass smoothly through the weaving web.  These shuttles are wound in a circular path around the centre of the shuttle.

Ski Shuttle
Ski shuttles do essentially the same job as rag shuttles and are designed to hold medium weight yarns. Begin winding the shuttle by holding the yarn in place around the ski base and anchoring the yarn with subsequent passes.  Continue until the ski section is full but not overflowing the shuttle. This allows the smooth bottom and top of the shuttle to slide through the web.  These shuttles are unwound by hand before each pick.

Boat Shuttle

Boat shuttles were the first type of shuttle that unwound in a continuous and automatic manner.  The boat shuttle has a spool or bobbin rotating freely on a fixed spindle.  The shape, size and weight of the shuttle vary and should be chosen with the weavers needs in mind.  Currently two styles are most prevalent, open bottom and closed bottom, there is little difference in the performance and is strictly preference. There is little doubt that a boat shuttle loaded with a bobbin increases your efficiency because you don’t need to unload the yarn at every pick. Boat shuttles are excellent for looms with shuttle races like table looms and floor looms.  The quality of the weaving bears heavily on how well the bobbin is loaded.
To wind a bobbin you fill up each end of the bobbin in turn, close to the inside of the bobbins ends. Then you run the yarn back and forth across the centre of the bobbin evenly, right up onto the ends which have already been filled.  Lastly you create a small hump in the centre of the bobbin.  Filling the bobbins evenly like this stops the yarn from tugging and giving you ‘mouse nibbles’ at the selvedges.

A helpful hint is to extend the slit on the side of the shuttle, it should be the length of the bobbin. This decreases the angle that the weft is released of the bobbin, which helps to even the tension that the weft is released from the shuttle.

Double Boat Shuttle 
A double boat shuttle is a very specialized tool that you may choose when you want to put two wefts through the same shed.  Although you can wind two threads together onto a single bobbin, it’s really difficult to keep the yarns from crossing around each other and to maintain an even tension. Inevitably one gets wound tighter than the other regardless of how much care you have taken. Winding two separate bobbins and releasing them individually alleviates the problem.

End-Delivery or End-Feed Shuttles
These shuttles are the ultimate automatic releasing shuttle for hand weaving. They are lightweight, comfortable to throw and catch, adjustable to a variety of yarns and easy to thread. The end-delivery shuttle has a pirn which remains stationary, instead of a free spinning bobbin. The weft yarn unwinds off the pirn’s tip when the shuttle is in motion and stops unwinding when the shuttle stops unlike a bobbin which continues to spin and release yarn. The yarn comes off the pirn and goes through a set of tension pads and comes out of the shuttle at a constant tension. This even delivery of weft causes less draw-in, which in turn makes better selvedges.

Pirns are loaded differently from bobbins; they are wound from the large end toward the narrow end, decreasing in volume as you go along the pirn.  You can never backtrack more than a half inch or so while filling a pirn or the yarn will not unwind correctly.  Here is an old post on how to wind a pirn.
My favourite End Feed Shuttle is a Schacht because it is so light, it's the lightest on the market.  And because the tensioning system which is incredibly easy to thread, some of the others you need to use a crochet hook and good luck.  But with a Schacht all you need to do is pull about a three inch length off of the pirn, hold the thread with your finger against the pirn to give it tension then just place the thread between the pads and follow the slit.  Easy!

Netting Needle or Netting Shuttles
These were formerly used to mend nets but now have become a tool in the hand weavers arsenal. They are not shuttle in the truest sense of the word, but rather a pointy end attachment to get the yarn through the web.  The yarn is not wound on the needle but rather hangs freely like a hand sewing needle.  This is a great tool for tapestry and inlay techniques where the weft is carried in and out of the warp, rather than as a primary weft supplier.  The pirn is for scale.

Tatting Shuttle
As the name indicates these tiny shuttles are used for hand tatting, but are quite perfect for holding those tiny fine threads used for inlay or finger manipulated weaves.  The shuttles are loaded by sticking the end of the thread through the hole in the centre of the shuttle and wrapping the thread round the bobbin until it is fully loaded.  Only a tiny amount of yarn is held on this shuttle.  Again the pirn is for scale.

E-Z-Bob
This is a really great tool for securing yarns while weaving.  Designed for use with the Loucet or Kumihimo Disks they serve admirably for inlay, finger manipulated weaves or as I have used them in the past for weaving bookmarks, five patterns at the same time on the loom.  They are loaded by pressing the centre and popping the spool open, then winding the yarn around the centre.  Clicking the E-Z-Bob closes secures the yarn in place and they must be manually unwound for each pick.

That's it, it is amazing all the different shuttles that are out there.

Friday, February 3, 2017

Tying a String Heddle

Surprisingly I have never had to tie a string heddle before but I made a drafting mistake with my Crackle shawls.  I need to add six threads but with 852 threads I am not going to re-thread the entire warp!

So to start you need a strong piece of thread, I am using pink 2/8 cotton.  You don’t have to use pink, but it sure is pretty!  You will need a piece that is double the height for your harness plus a couple of inches for the take up from the knots.
Loop the thread over the bottom of the heddle.  Straighten up the ends of the soon to be string heddle. Push one of the existing heddles on the shaft nearby as you will need to measure off it.
Make an overhand knot in the string heddle that lines up to the bottom of the eye in the heddle that you are matching.  Make sure that the string heddle is held taut, not loose.
Do a second overhand knot above the first on; it will close the eye of the heddle.  It is important that the loop you are making also matches up with the eye of the heddle that you are matching.

Last step is to go around the top of the heddle and tie two knots to hold the string heddle in place. Make sure that the string heddle is tied not too loose or too tight; you want it to slide across the harness but not to be sagging.
The last step is to trim the long tails above the knots so they don’t get tangled in the other heddles.
The string heddle is now ready to use.  Well I guess the very last step is thread the heddle!
Final Garden Photo is Sweet Box (Sarcococca) it is just starting to bloom and it has a lovely strong vanilla smell.

Tuesday, September 30, 2014

Blue Ivy Katazome Shawl

This second shawl sat around for a few weeks before I finally came up with a dye plan. The story about the weaving the two shawls can be found here on a previous post.  

My idea was to use a stencil to dye a pattern onto the shawl; but ...the problem is that we live in a small town on an island and I couldn’t source any dye thickeners locally that would work with the Procion MX.  I really didn’t want to drive three hours to Victoria or wait for an order from the internet or take an ocean voyage to go to the mainland; so the only course of action was to find a DIY alternative on the internet. 

I stumbled upon katazome which is a Japanese dye technique using a resist paste applied to the cloth.  The best part is that the resist paste is rice flour, and that I could find!  A little research later and I found that wheat flour can also be used ...even more awesome!

So here is how I did it for the first time – no sampling/testing just straight onto the shawl!  First I washed, dried, ironed and trimmed the threads from the shawl.  I left the fringe untwisted.
I made a table long enough to hold the shawl and the fringe.  I used a piece of firm insulation on top of some boxes to extend the sawhorse table!  Then I covered it with a large piece of plastic sheeting, like the stuff used for painting drop cloths.  I made sure that there was enough overlap to wrap the dyed shawl.
The next step is to make the paste.  I used ½ cup all-purpose flour and ¾ cup of water, adding more water to get the right consistency.  You want a mixture like thick cream, not too runny but not too thick.
I did a test run on the kitchen counter to make sure that it was able to hold the shape of the stencil and it looked good!
We (Mum and me), measured out the halfway point of the shawl, marking it with a pin.  We then figured out the placement of the stencil and found out that we would need to flip the stencil over so that the ends would match (having the end ivy pointing down to the edge on each side).  Then it is just a matter of glopping the paste down on the stencil and lightly pushing it around using a small offset spatula.
For the centre motif I didn't want to use the whole stencil so I just taped off the areas I didn't need with painters tape.
The shawl had to be left overnight so that paste could dry.  It was weird to see that when the paste dries it pulls and puckers the shawl. 
So the next day is dye day.  The first step is to make a solution of soda ash and water.  I used 2 teaspoons of Soda Ash with 8 cups of warm water.  I only needed about 1 cup for the shawl but we were able to use the rest of the dye to dye some silk yarn.  I sprayed the soda ash solution all over the shawl until it was wet but not soaking.  And I left it for 20 minutes, at about 10 minutes I gently pulled the shawl flat and made sure that there were no dry spots.  The soda ash is an important step to dyeing the Procion MX as it activates and sets the dye.
Mixing the dye comes next.  I choose Royal Blue in the Pale value.  The recipe is ½ teaspoon of dye, 2 teaspoons of salt, ½ teaspoon Urea and ½ cup warm water.  Mixed together the ingredients into a cup and then I poured mine into a sprayer.
I sprayed the dye from only one side of the shawl to make an ombré effect.  I only used maybe ¼ cup of dye water, it goes along way! 
When I was happy with the dye coverage we folded the plastic sheet over the shawl for the 24 hours needed for the dye to set.  While the shawl was batching I had mild panic over how I was going to rinse the dye and get rid of the resist paste!!
Thankfully the first and easiest method worked.  I took the shawl outside and used the garden hose to rinse off the resist paste and dye!  The flour paste easily rolled off the shawl and with the small amount of dye used in the shawl it quickly rinsed clear.
The shawl looks amazing!  I really can’t quite believe how well the flour paste resist worked.  I already am looking at the other shawl thinking that I’m going to dye it too!
The final photo shoot for the shop and the shawl looks wonderful.  I love the sky blue colour and the ivy motif is so pretty.  For Sale.
So that is how I do katazome dyeing – a little differently than the traditional technique – but it worked!