We went on the Denman Island Home and Garden Tour this weekend. It is a charity fundraiser for the Denman Island Conservancy association which has protected over 700 acres of Denman Island. Denman Island is up near us in Comox; it can be seen from our harbour. It lies just off of Vancouver Island, just a 10 minute ferry ride. It is approximately 51 square kilometers and is 19 kilometers long and 6.5 kilometers wide.
It was a lovely day for a short ferry ride across the Baynes Sound to Denman Island.
Baynes Sound is the area on Vancouver Island that grows oysters, you may have heard of Fanny Bay Oysters. Fanny Bay is just 5 minutes down the road.
When we got to Denman Island we headed up to the Main Street to get our tickets and a map of the Island to start our adventure. The first garden shows how hot and dry it has been and they don’t have the water to spare to water their lawns. But still a field of poppies and dandelions is a pretty sight.
I am not going to show you all the gardens just some highlights that we went to but what every garden had in common was the roses. Denman is an Island of roses, the smell was spectacular.
As we toured the island we found ourselves on the far side of Denman Island which is the view of another island called Hornby Island and the mainland (the British Columbia coastline). This section of the Pacific Ocean is called the Strait of Georgia, which is part of the Salish Sea.
The theme for this year’s Garden Tour was wetlands and this has to be the prettiest, a lovely bridge arching over the pond with yellow irises. There were Muscovy ducks running around too!
Now it is time for lunch we stopped at a provincial park called Fillongley and our view was of Hornby Island, you could see the whole island.
Onto the next garden, it was the best one by far. It has been featured in many gardening magazines, it was a large perennial garden.
There was a large patch of Turkish Sage that just caught your eye.
And a Star of Persia allium, they may be short but they pack a punch.
At the last garden we saw this plant didn’t know what it was but with a picture and the internet we found it is called Jupiter’s Beard and have already been to the garden nursery and picked up some (and already planted!).
The best garden art was this heron, made from wrapped fabric and a crocheted table cloth!
We are hot and tired now so back down to the ferry terminal for the ocean voyage back to the Vancouver Island. We arrived in time to see the ferry came in, that grey line isn’t the road markings it is the cable used by the ferry, which is a greener alternative than the traditional ferries.
Finally we are on the ferry about to go back home to the big island, Vancouver Island. When you drive onto the ferry a crew member helps you park, they need you to park really close to be able to fit the most amount of cars. I parked so close to the car in front of me that the man wasn’t able to open his trunk! But I got a 'good job' from the crew member.
It was a long day but it really gave us a lot to be inspired by for our own garden.
Monday, June 17, 2019
Monday, June 10, 2019
Honouring Erica
Sadly, I have only recently learned that the Dutch weaver Erica De Ruiter died in March; Erica specialized in weaves that use 4 or fewer shafts.
Although I did not know Erica, I was always excited when I found one of her articles in Handwoven Magazine and I thoroughly enjoyed her book ‘Weaving on Three Shafts’.
It seems that Erica’s goal was to reduce weaving to the simplest number of shafts and still get the most beautiful result. If you can get your hands on a copy of this book I would encourage it.
In an effort to honor Erica I thought that I would share two of my very favourite articles by Erica, one in Handwoven Magazine and one online at WeaveZine.
In the November/December 2007 Issue Erica’s article entitled Three Towels ~ or One Wall Hanging ~ or Both; is such an exciting idea.
The premise is that you can weave three tea towels (3 yards of cloth) and then with clever folding and a dowel you can hang it on the wall of your kitchen displayed as a Kimono. Then when you feel need for a change, you can cut it apart, hem the ends and use the tea towels for many years. This is mind blowing for me, and I think shows just how inventive Erica De Ruiter was. Due to copyright I cannot show you any photos, but luckily, you can purchase this magazine from Interweave Press as a download.
The second really special and completely inventive article can still be found on WeaveZine and it was written by Erica in September 2008. This is a recipe for making a Spiral Zipper Bag using a long zipper and a length of inkle band. I found this so interesting and I have had it on my Want To Make list since I first found it. I am inspired by Erica’s ability to think in a non-linear way and to create beautiful and functional items in ways that I had never considered. I have included the link to WeaveZine here.
Our weaving community is much poorer since March and I will miss the joy of opening up Handwoven Magazine and finding one of Erica’s gems inside.
Although I did not know Erica, I was always excited when I found one of her articles in Handwoven Magazine and I thoroughly enjoyed her book ‘Weaving on Three Shafts’.
It seems that Erica’s goal was to reduce weaving to the simplest number of shafts and still get the most beautiful result. If you can get your hands on a copy of this book I would encourage it.
In an effort to honor Erica I thought that I would share two of my very favourite articles by Erica, one in Handwoven Magazine and one online at WeaveZine.
In the November/December 2007 Issue Erica’s article entitled Three Towels ~ or One Wall Hanging ~ or Both; is such an exciting idea.
The premise is that you can weave three tea towels (3 yards of cloth) and then with clever folding and a dowel you can hang it on the wall of your kitchen displayed as a Kimono. Then when you feel need for a change, you can cut it apart, hem the ends and use the tea towels for many years. This is mind blowing for me, and I think shows just how inventive Erica De Ruiter was. Due to copyright I cannot show you any photos, but luckily, you can purchase this magazine from Interweave Press as a download.
The second really special and completely inventive article can still be found on WeaveZine and it was written by Erica in September 2008. This is a recipe for making a Spiral Zipper Bag using a long zipper and a length of inkle band. I found this so interesting and I have had it on my Want To Make list since I first found it. I am inspired by Erica’s ability to think in a non-linear way and to create beautiful and functional items in ways that I had never considered. I have included the link to WeaveZine here.
Our weaving community is much poorer since March and I will miss the joy of opening up Handwoven Magazine and finding one of Erica’s gems inside.
Monday, June 3, 2019
Eight Shaft Korndrall Tea Towels
Finally I think I’ve got a handle on the gardening and house maintenance for awhile, so I’ve actually sat at the loom for the last couple of days.
I have had a warp on the loom for quite some time. I made some tea towels in January and they turned out really well. I decided that I loved the pattern and I decided to amend the warp making the stripes and squares larger. That was an unmitigated disaster as the edges were so uneven and bumpy due to the weave structure. I had fun cutting the weft out. I decided to leave the warp in place, but to re-thread and re-design. I chose to keep the same tie-up. This is the final draft, not the one I had thought to use originally.
The new stripes are almost exactly half the size of the original and so there was some warp thread manipulation happening. It was a bear to thread with all the crossing over.
On every coloured stripe there was one extra thread that had to be left dangling, to keep up the tension I’ve just hung them together with a weight.
I’m a sucker for stripes so these tea towels have 5 thin stripes at one end. I tried to do stripes of varying thicknesses, but with the pattern it just looked odd, so five even stripes looked the best.
I love a shot of the warp wrapping ever so neatly around the beam.
Today I got this big boy, and I do mean BIG, delivered. The roll of one sided cardboard is 3 feet wide and 250 feet long and Ngaire can't get her arms around it. Yikes!
I ordered it to replace my current cardboard that I use on the front beam to make sure that the tie on knots don’t distort the first few wraps on the breast beam. As you can see, my old cardboard is really
thrashed.
I will also use it to replace the paper rolls that I use for beaming and offer the extra to other weavers who may need a few yards for their looms. Otherwise I may have enough cardboard for this life and the next!
Today I have two beauty shots for you. This is the first dessert we made using dome moulds for Mothers Day. It is frozen lemon cremeux with a lemon shortbread crumb and lemon curd. It was so yum!
Todays garden shot is of Siberian Iris (Iris sibirica) at it's very best this week.
I have had a warp on the loom for quite some time. I made some tea towels in January and they turned out really well. I decided that I loved the pattern and I decided to amend the warp making the stripes and squares larger. That was an unmitigated disaster as the edges were so uneven and bumpy due to the weave structure. I had fun cutting the weft out. I decided to leave the warp in place, but to re-thread and re-design. I chose to keep the same tie-up. This is the final draft, not the one I had thought to use originally.
The new stripes are almost exactly half the size of the original and so there was some warp thread manipulation happening. It was a bear to thread with all the crossing over.
On every coloured stripe there was one extra thread that had to be left dangling, to keep up the tension I’ve just hung them together with a weight.
I’m a sucker for stripes so these tea towels have 5 thin stripes at one end. I tried to do stripes of varying thicknesses, but with the pattern it just looked odd, so five even stripes looked the best.
I love a shot of the warp wrapping ever so neatly around the beam.
Today I got this big boy, and I do mean BIG, delivered. The roll of one sided cardboard is 3 feet wide and 250 feet long and Ngaire can't get her arms around it. Yikes!
I ordered it to replace my current cardboard that I use on the front beam to make sure that the tie on knots don’t distort the first few wraps on the breast beam. As you can see, my old cardboard is really
thrashed.
I will also use it to replace the paper rolls that I use for beaming and offer the extra to other weavers who may need a few yards for their looms. Otherwise I may have enough cardboard for this life and the next!
Today I have two beauty shots for you. This is the first dessert we made using dome moulds for Mothers Day. It is frozen lemon cremeux with a lemon shortbread crumb and lemon curd. It was so yum!
Todays garden shot is of Siberian Iris (Iris sibirica) at it's very best this week.
Tuesday, May 28, 2019
Just Add Stones
Still not a lot of weaving going on at the moment but we are doing a lot of gardening. You may remember the runway strip of a garden that lines the driveway; I talked about it last week. Well, we pulled all the fig roots out (well most of them); we took out the bulbs and leveled the dirt. The big dirt pile at the end of the picture doubled in size, sorry about the repeat of last weeks photo.
We then spent days expanding some of the gardens with the extra soil. The garden with the orange tree by the front door doubled in size. It is looking a little bare right now but Mum grew some flowers from seed and we are just waiting for them to get a bit bigger before planting out.
We also added onto the long garden lining the outside of the fence. The area that we added is the two trellis fence panels. Two new hazelnuts were added and some lavenders.
There was still a lot of soil left so I spent four hours adding soil to the front garden. But I had to remove large soil lump from the driveway so that the stones could be dropped off this morning. Mum spend that day getting over her second dose of Shingrix....it knocked her for six!
The landscape fabric went down and holes cut for the plants and the sprinklers.
Then shovelful by shovelful the garden was covered in stones. It went quite quickly with all three of us working, the majority was done by lunch. There is still a little bit of stone left to add but it is 30 C it got far too hot so we are waiting for it to cool down. The garden looks great, and once it rains and washes away the dirt from the stone it will look better.
Look! There are two oranges on the orange tree!
We then spent days expanding some of the gardens with the extra soil. The garden with the orange tree by the front door doubled in size. It is looking a little bare right now but Mum grew some flowers from seed and we are just waiting for them to get a bit bigger before planting out.
We also added onto the long garden lining the outside of the fence. The area that we added is the two trellis fence panels. Two new hazelnuts were added and some lavenders.
There was still a lot of soil left so I spent four hours adding soil to the front garden. But I had to remove large soil lump from the driveway so that the stones could be dropped off this morning. Mum spend that day getting over her second dose of Shingrix....it knocked her for six!
The landscape fabric went down and holes cut for the plants and the sprinklers.
Then shovelful by shovelful the garden was covered in stones. It went quite quickly with all three of us working, the majority was done by lunch. There is still a little bit of stone left to add but it is 30 C it got far too hot so we are waiting for it to cool down. The garden looks great, and once it rains and washes away the dirt from the stone it will look better.
Look! There are two oranges on the orange tree!
Monday, May 20, 2019
How does the garden grow
Not a lot of weaving has been going on, what with company and trying to bring some order to the gardens. I thought that I would show you around the gardens.
First a stop is at the Veggie Pod, a waist high cold frame in which we keep kale, lettuce and start some seeds. The lid keeps the sulphur white butterfly from the kale and slugs from the lettuce.
Next is the runway garden, so called because is quite narrow and runs the length of the driveway. It is in the middle of a major revamp. There used to be large fig trees at the top, but they were too near the house so they had to come out. In the middle between the two sets of rhodos formerly held plums trees, but the ants and aphids made them awful. So we were left with just some sages, Mexican feather grass and the rhodos. Now the plan is to level the soil and take out all the extra soil, remove all the plants (re-homing what we can), leaving the rhodos and plant two new figs farther from the house, then put down crushed rocks over landscape fabric. You can see the old fig roots that we are having a difficult time removing!
The front garden is really starting to take off. The Siberian irises seem to have doubled since last year and are getting ready to bloom. The early alliums are adding a bright burst of colour against the white spring blooming plants.
Last year we put in a pergola with the trumpet vine which is looking really healthy. The Japanese maple called Orangeola is taking over the side garden. with abandon. Two new hazelnut trees have been added along the fence and you can just see the flash of colour that is the 'Hot Shot' azaleas in the distance.
Around in the back garden there is a small green waterfall Japanese maple that we found as a seedling. The green sedum is putting out a lovely show of tall airy spikes of white flowers; they seem to be taller this year for some reason. There are hostas just at the edge of the frame along the garden shed.
A little herb patch in the front of this bed that is about to be overwhelmed by the Gooseneck Loosestrife, I need to go and reign it in before it is too late, but I love the Goosneck in flower arrangements in the summer. The back yard is always the last of the gardens to be wrangled into shape in the spring.
The other garden that is getting a revamp is the fernery in the north garden. The back fence used to be covered in various ivy and there is still a little patch that needs to come out but it is very hard work to get ivy out once it is established. We have added some bee balm but still have a few areas to add some more shade loving plants. The little tree by the rhubarb is this springs stand out plant.
It is an enkianthus ‘red bells’. The tree is just covered in pretty red striped flowers and the bees, bumble bees and the humming birds all love it!
First a stop is at the Veggie Pod, a waist high cold frame in which we keep kale, lettuce and start some seeds. The lid keeps the sulphur white butterfly from the kale and slugs from the lettuce.
Next is the runway garden, so called because is quite narrow and runs the length of the driveway. It is in the middle of a major revamp. There used to be large fig trees at the top, but they were too near the house so they had to come out. In the middle between the two sets of rhodos formerly held plums trees, but the ants and aphids made them awful. So we were left with just some sages, Mexican feather grass and the rhodos. Now the plan is to level the soil and take out all the extra soil, remove all the plants (re-homing what we can), leaving the rhodos and plant two new figs farther from the house, then put down crushed rocks over landscape fabric. You can see the old fig roots that we are having a difficult time removing!
The front garden is really starting to take off. The Siberian irises seem to have doubled since last year and are getting ready to bloom. The early alliums are adding a bright burst of colour against the white spring blooming plants.
Last year we put in a pergola with the trumpet vine which is looking really healthy. The Japanese maple called Orangeola is taking over the side garden. with abandon. Two new hazelnut trees have been added along the fence and you can just see the flash of colour that is the 'Hot Shot' azaleas in the distance.
Around in the back garden there is a small green waterfall Japanese maple that we found as a seedling. The green sedum is putting out a lovely show of tall airy spikes of white flowers; they seem to be taller this year for some reason. There are hostas just at the edge of the frame along the garden shed.
A little herb patch in the front of this bed that is about to be overwhelmed by the Gooseneck Loosestrife, I need to go and reign it in before it is too late, but I love the Goosneck in flower arrangements in the summer. The back yard is always the last of the gardens to be wrangled into shape in the spring.
The other garden that is getting a revamp is the fernery in the north garden. The back fence used to be covered in various ivy and there is still a little patch that needs to come out but it is very hard work to get ivy out once it is established. We have added some bee balm but still have a few areas to add some more shade loving plants. The little tree by the rhubarb is this springs stand out plant.
It is an enkianthus ‘red bells’. The tree is just covered in pretty red striped flowers and the bees, bumble bees and the humming birds all love it!
Monday, May 13, 2019
Visiting Vancouver Island
Last week we had some family visiting from Australia and New Zealand, so we were busy showing off beautiful Vancouver Island. The weather was very much with us, it was ten degrees warmer than normal, and it was warm summer weather with lots of sun and blue sky!
First is a picture from Goose Spit in Comox looking at the magnificent Comox Glacier. This is home, lovely isn’t it!
We also had the Snowbirds, Canadian Forces Air Demonstration team, practicing overhead every day!
The next day we went on a trip to the west coast of the island to see Ucluelet and Tofino. But first we stopped at Cathedral Grove to see an old growth rain forest, yes, it really is that green!
We also stopped in Port Alberni; this picture was taken at the end of the pier looking down the inlet. Port Alberni is in the middle of Vancouver Island but it is at the end of a large ocean fjord. It had a large tsunami in the 1960’s due to an earthquake in Alaska.
Onto Ucluelet, which is a pretty little town. There is a lovely walk around the lighthouse that seems to have a spectacular view around every corner.
Then to Tofino and to the famous Long Beach. It is really long and sandy, which is rare for Vancouver Island. The wind felt like it was straight off the Arctic and it took your breath away!
The next day we went to Campbell River and the Suspension Bridge at Elk Falls. Always fun.
On the last day we drove them down island to Victoria where they were going to spend a couple of days exploring British Columbia’s capital city. But first we stopped at Goats on Roof, a fun collection of shops in Coombs and yes there are goats on the roof!
I didn’t take any photos of Victoria this time so I looked for some older pictures but I don’t seem to have any! But Victoria is a pretty city, with a lovely city center. There is also a lovely garden called Butchart that is worth going to see. And I’m going to have to go back soon and take some photos!
We had a lovely time with our family showing off our island home.
First is a picture from Goose Spit in Comox looking at the magnificent Comox Glacier. This is home, lovely isn’t it!
We also had the Snowbirds, Canadian Forces Air Demonstration team, practicing overhead every day!
The next day we went on a trip to the west coast of the island to see Ucluelet and Tofino. But first we stopped at Cathedral Grove to see an old growth rain forest, yes, it really is that green!
We also stopped in Port Alberni; this picture was taken at the end of the pier looking down the inlet. Port Alberni is in the middle of Vancouver Island but it is at the end of a large ocean fjord. It had a large tsunami in the 1960’s due to an earthquake in Alaska.
Onto Ucluelet, which is a pretty little town. There is a lovely walk around the lighthouse that seems to have a spectacular view around every corner.
Then to Tofino and to the famous Long Beach. It is really long and sandy, which is rare for Vancouver Island. The wind felt like it was straight off the Arctic and it took your breath away!
The next day we went to Campbell River and the Suspension Bridge at Elk Falls. Always fun.
On the last day we drove them down island to Victoria where they were going to spend a couple of days exploring British Columbia’s capital city. But first we stopped at Goats on Roof, a fun collection of shops in Coombs and yes there are goats on the roof!
I didn’t take any photos of Victoria this time so I looked for some older pictures but I don’t seem to have any! But Victoria is a pretty city, with a lovely city center. There is also a lovely garden called Butchart that is worth going to see. And I’m going to have to go back soon and take some photos!
We had a lovely time with our family showing off our island home.
Monday, May 6, 2019
How to Draft a Motif in Diversified Plain Weave
My study group, Exploring More, is looking at drafting a motif in different weave structures, the first was Huck Lace, and the second was Summer and Winter. The third is Diversified Plain Weave and I am going to take you through how I drafted a pattern.
I am going to use the new method for weaving Diversified Plain Weave, which is uses less shafts and has an easier treadling method.
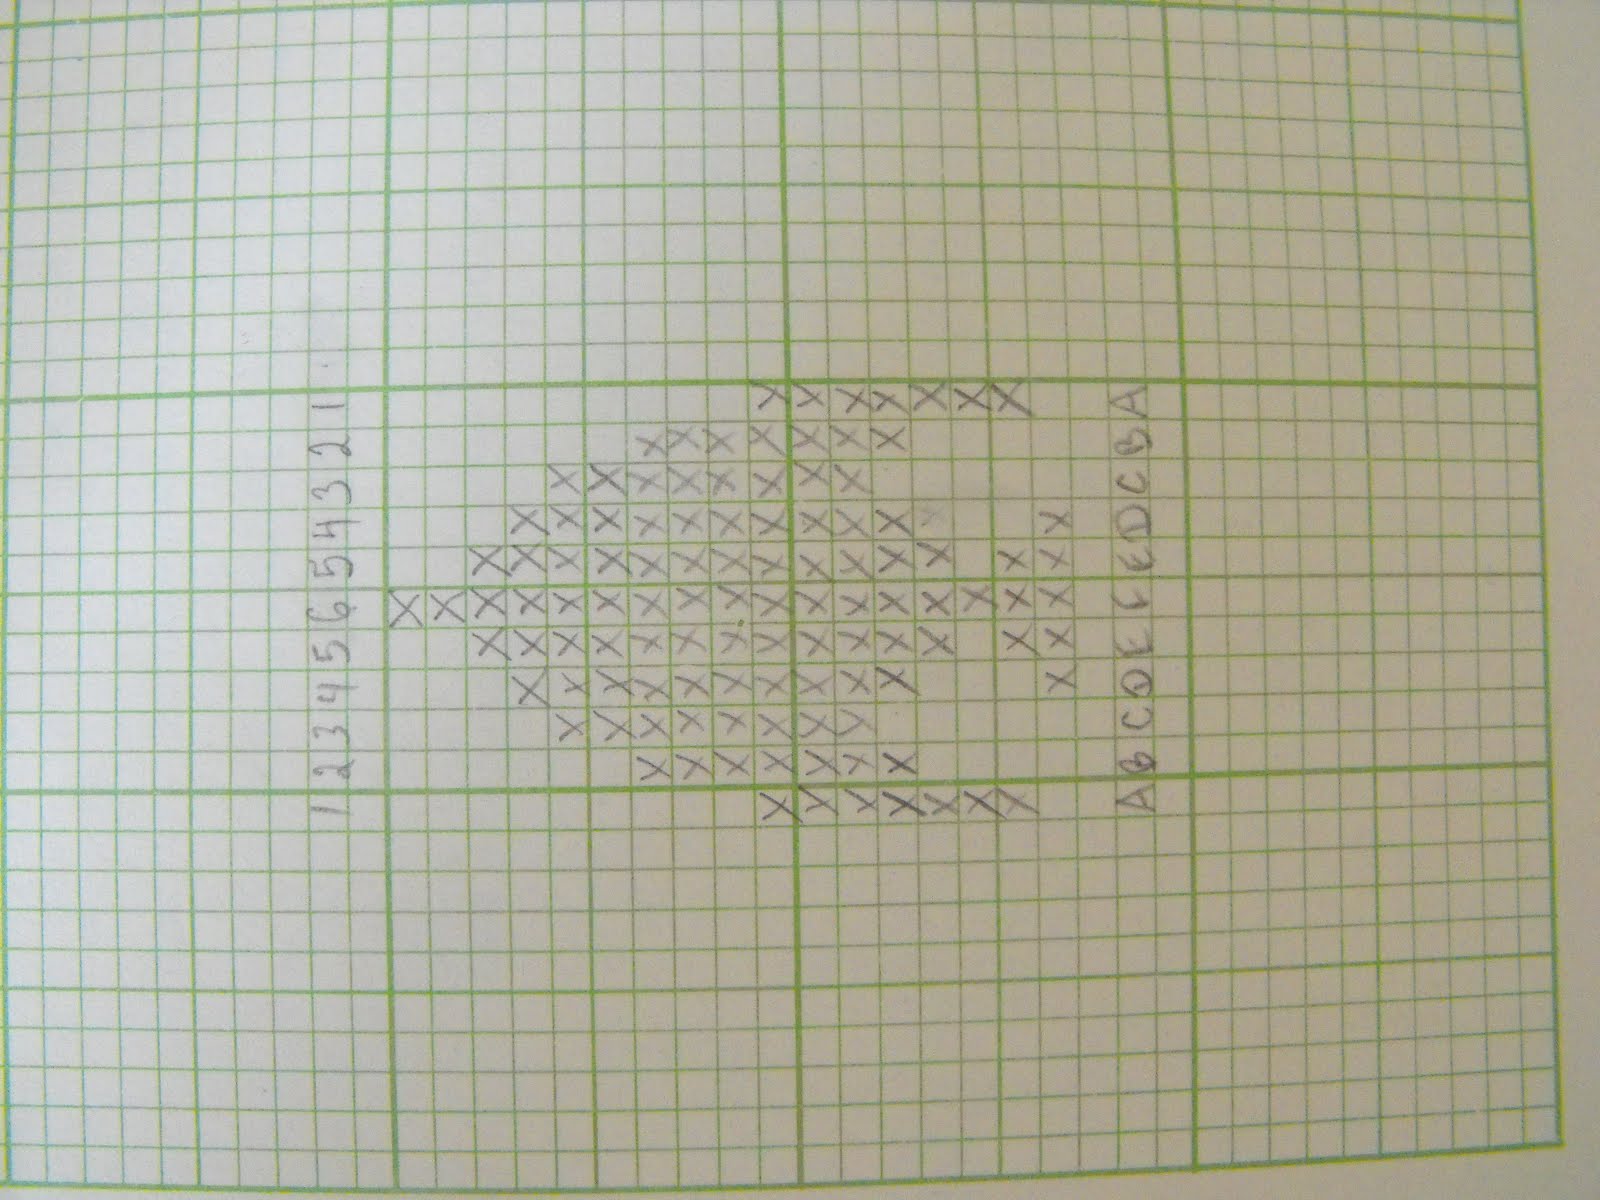
First thing is to choose a motif; I am going to use the same angelfish from the previous two posts.
Next is the threading; looking at the angelfish motif there is vertical symmetry so again the threading will be in point order (i.e. in a V shape). Use the threading blocks for the new Diversified Plain Weave which are Block A 123 Block B 124 Block C 125 etc. The tabby shafts 1 and 2 are in a thinner grist than the pattern shafts. I used an orange colour to highlight them.
The old Diversified Plain Weave threading blocks are Block A 232141 Block B 252161 etc. There are two pattern shafts required for each block with the old style. So by using the new Diversified Plain Weave threading blocks more pattern is created using fewer shafts.
The basic tie up for the new Diversified Plain Weave is to have the first two treadles be tabby shafts versus the pattern shafts. The pattern shafts then all have shaft 1 added to them.
The old Diversified Plain Weave tie up had the first two treadles as plain weave as opposites. And the pattern shafts also had plain weave on opposites along the bottom of the treadles. This created little squares of plain weave with the thinner tabby threads and the overall fabric had a basket weave affect.
Now for the tie up, just take the graph of the angelfish and place on its side with the top of the motif facing to the left, just like for Summer and Winter. Just use the angelfish motif to create the pattern from number 6 down to 1.
Now add the pattern shafts to the basic set up. You will notice that the tie up is quite similar to Summer and Winter, although without the ‘pairs’ of pattern treadles.
For the treadling I look back at the angelfish graph and can see that each treadle corresponds to a single unit, there is no symmetry. I will place the pattern treadles in straight order (in a straight line). The treadling block for the new Diversified Plain Weave is Block A 123 Block B 124 Block C 125 etc.
The old Diversified Plain Weave treadling blocks were Block A 232 Block B 141 Block C 252 etc. While weaving it could be very easy to lose track of which tabby you were using.
The finished angelfish is 9 Shafts and 12 Treadles. There is a lot of playing around that you can do with Diversified Plain Weave, for example how big of a difference between the grists of the pattern and tabby threads do you want or do you want to highlight the thinner tabby lines or do you want to hide them? Below I thickened the pattern threads in the warp and weft.
So that’s a small guide to how to design a motif in Diversified Plain Weave. For more information about the new versus old types of Diversified Plain Weave go to Weavers Issue 36 Summer 1997, the article is called Thick ‘n Thin Again by Madelyn van der Hoogt.
I am going to use the new method for weaving Diversified Plain Weave, which is uses less shafts and has an easier treadling method.
First thing is to choose a motif; I am going to use the same angelfish from the previous two posts.
Next is the threading; looking at the angelfish motif there is vertical symmetry so again the threading will be in point order (i.e. in a V shape). Use the threading blocks for the new Diversified Plain Weave which are Block A 123 Block B 124 Block C 125 etc. The tabby shafts 1 and 2 are in a thinner grist than the pattern shafts. I used an orange colour to highlight them.
The old Diversified Plain Weave threading blocks are Block A 232141 Block B 252161 etc. There are two pattern shafts required for each block with the old style. So by using the new Diversified Plain Weave threading blocks more pattern is created using fewer shafts.
The basic tie up for the new Diversified Plain Weave is to have the first two treadles be tabby shafts versus the pattern shafts. The pattern shafts then all have shaft 1 added to them.
The old Diversified Plain Weave tie up had the first two treadles as plain weave as opposites. And the pattern shafts also had plain weave on opposites along the bottom of the treadles. This created little squares of plain weave with the thinner tabby threads and the overall fabric had a basket weave affect.
Now for the tie up, just take the graph of the angelfish and place on its side with the top of the motif facing to the left, just like for Summer and Winter. Just use the angelfish motif to create the pattern from number 6 down to 1.
Now add the pattern shafts to the basic set up. You will notice that the tie up is quite similar to Summer and Winter, although without the ‘pairs’ of pattern treadles.
For the treadling I look back at the angelfish graph and can see that each treadle corresponds to a single unit, there is no symmetry. I will place the pattern treadles in straight order (in a straight line). The treadling block for the new Diversified Plain Weave is Block A 123 Block B 124 Block C 125 etc.
The old Diversified Plain Weave treadling blocks were Block A 232 Block B 141 Block C 252 etc. While weaving it could be very easy to lose track of which tabby you were using.
The finished angelfish is 9 Shafts and 12 Treadles. There is a lot of playing around that you can do with Diversified Plain Weave, for example how big of a difference between the grists of the pattern and tabby threads do you want or do you want to highlight the thinner tabby lines or do you want to hide them? Below I thickened the pattern threads in the warp and weft.

So that’s a small guide to how to design a motif in Diversified Plain Weave. For more information about the new versus old types of Diversified Plain Weave go to Weavers Issue 36 Summer 1997, the article is called Thick ‘n Thin Again by Madelyn van der Hoogt.
Subscribe to:
Posts (Atom)