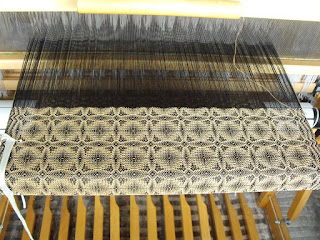
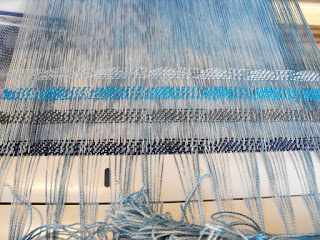
The beginning of the year is always tea towel time for us. The newest tea towel warp is a lovely shade of blue with six stripes of turquoise that have a pin stripe of peach.
The pattern is an eight shaft drall and the weft is navy blue. Drall is a Swedish term for turned twill. And turned twill means that areas of the draft are 1/3 twill and other areas are 3/1. In this case the stripes are 3/1 twill and the rest is 1/3 twill. The stripes almost have a braided appearance and the large areas are lovely blue dots speckled on a navy background.
I like to have a border of stripes on each towel and in with this draft when I turned the twill in the treadling, like magic, the blue warp appears as the stripes. It is a really nice way of making a border for the tea towels without changing the weft.
I like to make a unique border pattern for each tea towel so I write down the pattern but I also take a picture to make sure that I have a backup just in case. This is towel two.
After two towels I decided to try different weft colours, white and a light grey. But I didn’t like either of them so back to the navy I went.
This is towel three and I seemed to have not taken a picture of towel four.
I like to machine wash and dry the tea towels and then steam press before turning up the hem. I use a metal ruler to measure the turned up hem, the one drawback to this is that the metal ruler does get really,really hot!
Then the tea towels are hand hemmed before getting a second and final steam press. Here are the final pictures of the tea towels. For Sale.
For Sale.
Final Garden Shot is Puschkinia or Russian Snowdrops....after the slug attack only a few survived!
Monday, March 25, 2019
Monday, March 18, 2019
Handwoven Garment Number Three
I’ve finished my second vest using Ngaire’s yardage. This time rather than drafting my own pattern, I used an old favourite, McCalls 7407. I have used this pattern before with pretty good success, so I thought I’d make my life easier.
I’ve again used decorative river stones to hold the pattern in place while I’m sorting out where the pieces will best fit. I love this trick as it is much easier than pinning and unpinning each piece as you move them around.
I wanted to show that this was a truly handmade garment and there is no better way to do that than with embellishment.
My first thought was to make tassels on each side of the bodice. My thought was to attach a cord and make a loop on each side and pull them over one another giving a loose tie. Hmmmmm, no!
Then I thought I would make a tassel cord.
I used Bamboo 7 for the three strand cord and slip knotted it into a loop. I made the tassel using the slip knot for the centre of the tassel. Then using basic wrapping created the tassel.
The idea for the vest was to use buttons on each side of the bodice and loop the tassel over them to act as a closure.
Out came the button box and then I spent a blissful hour picking and sorting through them. I became very nostalgic because this was something I did as a child, sitting on the living room carpet sorting away!
Buttons were chosen and the tassel was hung....nope, it didn’t work and it made the bodice sag.
My solution was cheap and cheerful, hook and eye closure. Sometimes the simplest really are the best.
I think it worked well and it quietly makes sure that the neckline remains in place, showing off the nice scoop neck.
Our fashion show at the guild is next week and I feel really happy to be able to show all three of the garments made from Ngaires yardage projects. This lovely Capelette, the Open Backed Vest and this vest.
I’ve again used decorative river stones to hold the pattern in place while I’m sorting out where the pieces will best fit. I love this trick as it is much easier than pinning and unpinning each piece as you move them around.
This is a fully lined vest, so I did the same again with the lining. I have a real beef with the linings that are available to me on the Island. We have a very limited selection and sadly lower quality than what I would have wished for.
I will fast forward through all the sewing as it really was very straightforward and move on to where the real angst began.I wanted to show that this was a truly handmade garment and there is no better way to do that than with embellishment.
My first thought was to make tassels on each side of the bodice. My thought was to attach a cord and make a loop on each side and pull them over one another giving a loose tie. Hmmmmm, no!
Then I thought I would make a tassel cord.
I used Bamboo 7 for the three strand cord and slip knotted it into a loop. I made the tassel using the slip knot for the centre of the tassel. Then using basic wrapping created the tassel.
The idea for the vest was to use buttons on each side of the bodice and loop the tassel over them to act as a closure.
Out came the button box and then I spent a blissful hour picking and sorting through them. I became very nostalgic because this was something I did as a child, sitting on the living room carpet sorting away!
Buttons were chosen and the tassel was hung....nope, it didn’t work and it made the bodice sag.
My solution was cheap and cheerful, hook and eye closure. Sometimes the simplest really are the best.
I think it worked well and it quietly makes sure that the neckline remains in place, showing off the nice scoop neck.
Our fashion show at the guild is next week and I feel really happy to be able to show all three of the garments made from Ngaires yardage projects. This lovely Capelette, the Open Backed Vest and this vest.
Labels:
Etsy,
Fabric,
Finished Project,
Finishing,
Handwoven Garment,
Sewing
Monday, March 11, 2019
Black Tencel Shawls in Eight Shaft Twill
Just before Christmas I got a commission for a shawl similar to one that I had woven but had recently sold. The shawl was purple silk and a black Tencel warp with a favorite twill pattern called Frost Crystals. I didn’t take any photos of it on the loom but here it is getting ready to be shipped.
It is always more economical to put on enough warp for two shawls than for just one shawl, so that's what I did. I could have cut off the first shawl for the commission but I had enough time that I could weave both shawls at once. I tried out a couple of weft colours in Tencel, a blue, gold and white.
I thought that the white was a little stark and the gold a little brassy and the blue OK but not quite what I had in mind. Thankfully, I have another warmer gold colour called Straw, which I think works a lot better.
I was going to change the tie up and/or the treadling but I really do love this pattern, so I stuck with it.
When I start to twist the fringes I chose the number of threads in each bout and then make sure my math is right by flicking every other bout up onto the book that I am using as a weight.
The gold shawl has such a wonderful drape and the warm gold colour is quite stunning and dramatic. For Sale.
Final Garden Shot is a hardy orange called Flying Dragon (Poncirus trifoliata) and yes, that is snow behind it!
It is always more economical to put on enough warp for two shawls than for just one shawl, so that's what I did. I could have cut off the first shawl for the commission but I had enough time that I could weave both shawls at once. I tried out a couple of weft colours in Tencel, a blue, gold and white.
I was going to change the tie up and/or the treadling but I really do love this pattern, so I stuck with it.
When I start to twist the fringes I chose the number of threads in each bout and then make sure my math is right by flicking every other bout up onto the book that I am using as a weight.
The gold shawl has such a wonderful drape and the warm gold colour is quite stunning and dramatic. For Sale.
Final Garden Shot is a hardy orange called Flying Dragon (Poncirus trifoliata) and yes, that is snow behind it!
Labels:
Fancy Twill,
Finished Project,
Shawl,
Silk,
Tencel,
Twill
Monday, March 4, 2019
Silk Scarves Inspired by an Impressionist
I am still working through the bag of hand dyed silk warps that we dyed ages ago, they seem to multiply in the cupboard! This time the warp has been dyed with streaks of pale blue and green but keeping some of the original white silk warp.
The warp reminds me of a Monet Waterlilies picture, so I continued with that inspiration. I chose a favorite pattern, the network circles to represent the lily pads. But, I quickly realized that I didn’t have the right shade of green to compliment the warp.
Luckily I had a really pretty blue Tencel that both complemented and highlighted the warp and allowed the pattern to shine through. Now, the warp is resembling light sparkling off the water.
The finished scarf is lovely and oh so very subtle. The drape and the flow of the scarf is very stream like. For Sale.
The next hand dyed silk warp is similar in colour to the first one. For this warp I used a spray bottle to apply the dye. The warp has streaks and dots of different intensities of blue.
I always seem to have to try a lot of wefts before I find what I am going to use. The first testing of wefts are pale teal, pale blue and navy. The top two wefts are too pale and the navy is a little predictable but it works.
The seconding auditioning I went with white, mid tone blue, grey and the same navy. Nothing really works but the navy in my opinion.
For the second scarf I used the same threading and tie up as the first scarf but I changed the treadling. The new motif could be little diamond shaped leaves, or little thumb prints. Either way the pattern is quite lovely.
The finished scarf is very striking. For Sale.
Final Garden Shot is some spring crocuses. We thought that we had lost them last year to a foraging bunny but a few are still here. They are a little bruised and battered due to either the deer walking all over them or the crows that insist on pulling them up this year. I think that we will lift them this year and put them into the back garden as that is fenced and maybe they will survive.
Labels:
Colour,
Dyeing,
Finished Project,
Network Twill,
Scarf,
Silk,
Tencel
Subscribe to:
Posts (Atom)