We are now almost five months into our new home and as much as living on the ‘Wet Coast’ will allow we’ve managed to get a quite a few projects done outside.
The not so nice spring weather has made weaving everyday an easy goal to meet and we have set up our Etsy shop (NyreeLynn). So we thought today was a good day to tackle something new that falls into the 'why the heck not' category!
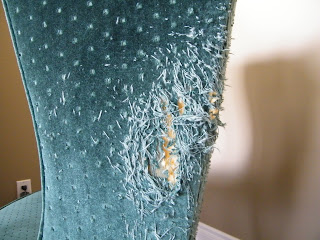
Our friends had a couple of small wing back chairs that were destined for recycling. The chairs were being stored where their cat had access ~ that pretty much says it all! These are really sweet chairs and I thought they had potential. We decided that having them professionally upholstered was out right now as all the other projects have left the wallet a bit slim, but I knew that we could make them pretty!
First we cut off all of the shredded fabric; this showed that all of the damage was on the sides and backs of the chairs and it was deep, this is just a small sample of what we cut off!
The front of the chairs was fine and so we decided to just cover over the backs and sides of the chairs.
A quick trip to the discount bin at Fabricland and $29.00 later Ngaire had found the perfect fabric. I was really happy with the fabric, it lightens up the all over green chairs, it was a simple pattern to match and the green colour was a match.
I made a paper template and cut the fabric a few inches larger than the chairs and we took special care to make sure that the pattern on the fabric landed in the same place for all four sides of the chairs. The pattern runs down the centre on the back of the chairs, who doesn't like matchy, matchy?
Before we started I pinned the pieces onto the chairs to make sure I had done it right, looks pretty good!
Michael loved this project because he got to buy a new tool...the pneumatic staple gun made the whole thing possible. Ngaire go to do the actual shooting, I'm the fold and hold gal! We stapled the fabric over the top of the old fabric, making sure that the staples fell into the ditch behind the original trim.
I can’t believe how cute these look! It took about six hours from start to finish, but I think it was well worth it! You really can’t see the staples too much, but I think I’ll hunt up some kind of trim to cover them later on.
From the front the chairs still look the same, but now that I look at things I think the next project will be to refinish the tops of those nesting tables. Including the purchase of the staple gun, the project price ended up being $40.00 per chair!


