Showing posts with label Plain Weave. Show all posts

Wednesday, December 22, 2021

All That Glitters Collapse Weave

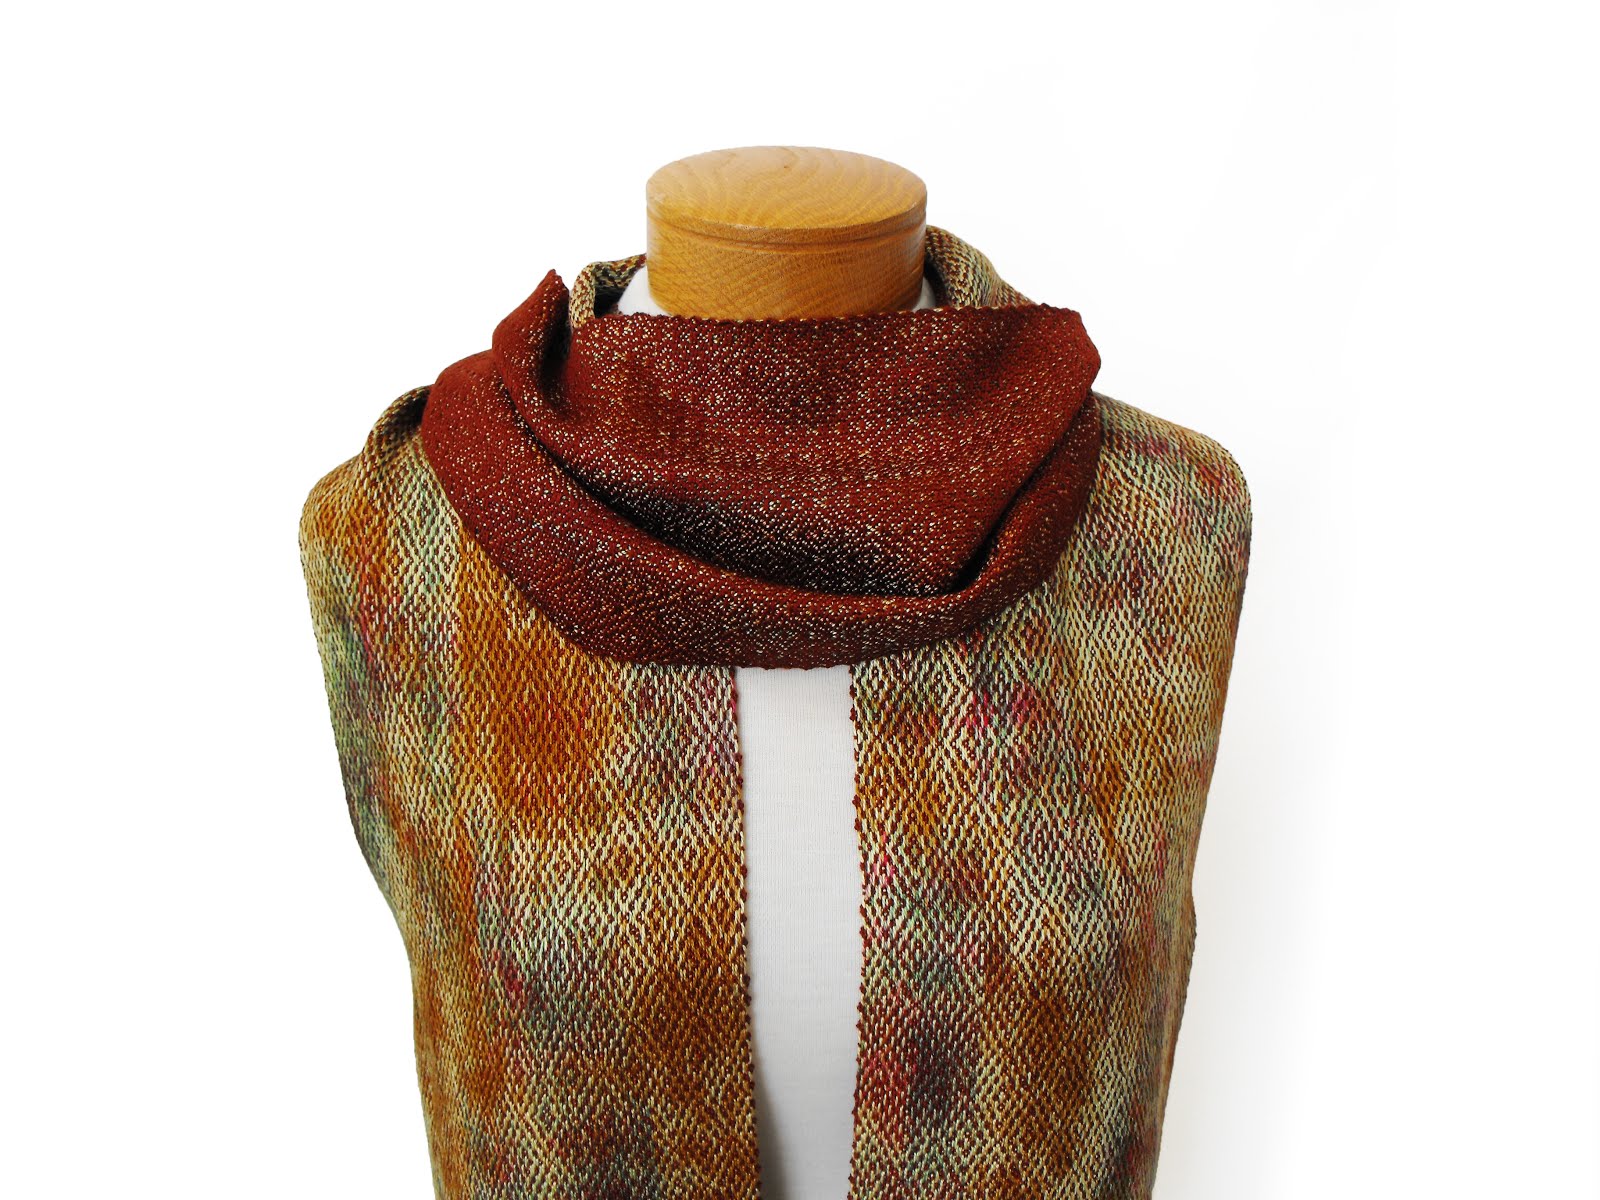
After the wonderful success that Ngaire had with her scarves, I jumped on that glittery bandwagon!  This style of collapse weave really reminded me of a Fortuny dress, with all the stunning pleats and the ability to curve and hug the body.

Hoping to expand on the theme I decided to weave my scarves using Cobweb Merino Wool, Cotton Slub and Lumeya glitter.  The Cobweb Merino is in a pale, pale lavender, the Cotton Slub is soft white and the Lumeya glitter is pure silver.  It is a really lovely combination with an overall soft grey vibe.

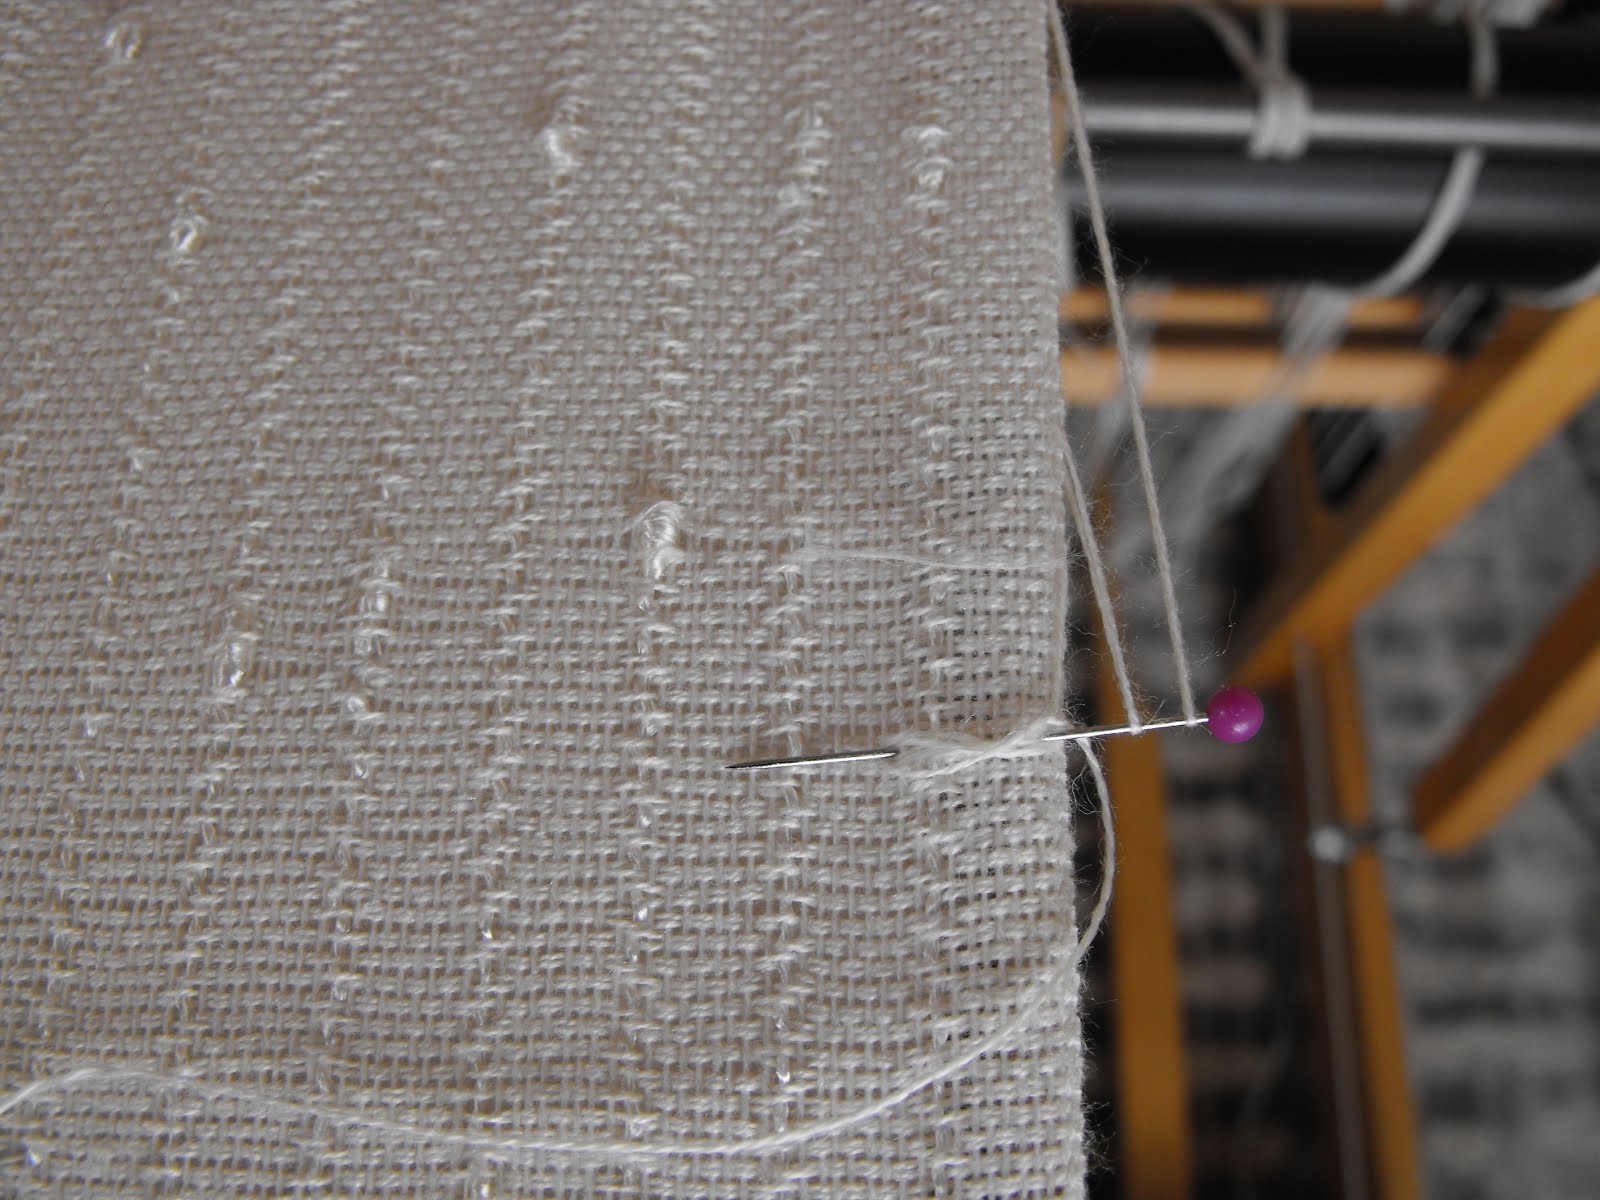
Pulling the warp did not start out well because I was trying to pull the cobweb merino and the glitter together since they would ultimately share a heddle, this seemed like a good plan at the time.  But, they had such hugely different levels of stretchyness it was a nightmare!  Started again and pulled each of the different warp threads separately and it was much better.

Putting the warp on the loom went fairly well and using this pipe insulator really helped the ends not tangle in the raddle.  [This was the same piece of foam that Ngaire used to even out her tension on her collapse weave.]  The end of the warping process left the final few inches a tad snarly though.

I do love a photo of the warp when it is all organized.

Weaving plain weave was pretty boring, but using super fine over-twisted wool added interest and a little bit of trepidation, especially on the selvedges.  It is absolutely imperative to beat on the following closed shed to maintain the loose, even beat. 

The two scarves came off the loom essentially the same size and they are absolutely gossamer-like before washing.

After a long soak in Eucalan and the hottest water I could get they were squeezed dry and then popped into a hot dryer to tumble and transform for twenty minutes. 

Voila! They are stunners and truly resemble the pleats in a Mariano Fortuny dress.  I’m so sorry that the weather is so very grey and that I can’t capture the amazing sparkle, but trust me, sparkle they do!

I bought an Amaryllis bulb last month and she’s a looker!

Merry Christmas Everyone.

Saturday, December 11, 2021

Collapse Weave Scarves in Fawn

My favorite winter scarf is one that my Mom wove in Collapse Weave way back in 2015.  The scarf is a beautiful soft rose Merino wool with a lovely crepe de chine texture and a wonderful drape.  So I decided to weave this exciting weaving technique!


The warp I'm using consists of 2/16 Merino wool in tan, a rayon knop in Peanut beige and Lumeya Luster in gold.  The Lumeya Luster is from Reiko Company in Japan.  It is a neutral colourway but the sparkle of the gold Lumeya makes this warp really pop.  It just glitters and shines even in the weak winter sunlight.  This technique is all about differential shrinkage so I don’t really know what will happen with the Lumeya shrinkage wise, I also don’t know if it’ll be strong enough to be warp!  But it sure is pretty.


I made enough warp for two scarves and beaming the warp went surprisingly well . . . for the first couple of yards.


But then the Lumeya stretched slightly making it a little longer than the rest of the warp which created loops that looped around the top raddle on the Spring loom.  I only broke three of the Lumeya threads but it was a bit nerve wracking pulling on the warp.  


The weave structure is plain weave and for the threading I placed the Lumeya and the Merino wool into the same heddle, yup there is a lot of shiny in this warp! 


The weaving of these scarves is a little different; I’m using a very fine high twist wool as the weft, it comes in at about 2/110, finer than sewing thread!  The beat for these scarves is very loose, about 10-12 picks per inch.  In the blog post from 2015 Mom said that it is best to squeeze the weft on a closed shed, boy am I glad to have that information.   


For such an open and airy beat the scarf didn’t weave up particularly quickly.  The rayon knots added some interest to the scarf; you just ignore the displacement of the weft going around the knots.  It was a pleasure to see the shine while weaving.


About halfway through the first scarf I started to notice that one side of the scarf was very tight.  So I added a piece of pipe insulation (a pool noodle or piece of foam would work too) to the back of the loom.  The warp was able to even out the tension by biting into the pipe insulation as needed and I was able to weave without hanging anything off the warp to try to even out the tension.


After the first scarf was finished I cut it off the loom and retied on for the second scarf.  The second scarf was woven just the same as the first.  Then scarves were hand wash in a mild soap and placed into the dryer for about 20 minutes but I stopped the dyer every 5 minutes to check and shake out the scarves.  Here are the final beauty shots of the scarf.  The scarves are light and airy with a wonderful shine from the gold Lumeya.

It is hard to get a photo in the winter sun showing the shine that these scarves have!  But the drape of these scarves is lovely and the soft brown colours of these scarves are just charming.  The Lumeya didn’t shrink at all, which isn’t a surprize but it made little loops that bring extra sparkle and shine to the scarf.
Final Garden Photo of the early snow that we got, La Nina is really feisty this year.  The Himalayan honeysuckle (Leycesteria formosa) was still in full leaf and flowering but this snow and cold snap is putting a stop to that.  But the glint of the sun shining off the snow reminds me of the scarves!

Monday, September 28, 2020

The End of Diversified Plain Weave

 I’ve started my third and final Fleur de Lis  runner and I must admit that I’m more than happy to see the end of this project.  I find that I can only weave for a very short time and then the fatigue of lifting 13 shafts on a treadle gets to me.   I can’t see myself choosing to weave such an unbalanced weave again, but I guess, never say never!

For this runner I am using a lot of what I learned in the previous two runners.  I am using the improved motif and the thinly woven hemline.  

My yarns are 2/8 orlec in dark teal and 2/16 cotton in blue teal.  When I went to take the photo and sat them on the shelf beside the fireplace I instantly know where the colour inspiration came from.

The plan for this runner is to weave 2 inches of hem in fine cotton only, to ensure it sits within the hem neatly.  Then to weave  2 inches for the underside covering hem and 4 inches of plan pattern before beginning the motif; hopefully this will allow the motif to begin away from where the runners drape over the table.  I am spacing my motif a full 2 inches apart on this runner.

I’m pretty happy with it so far and the colour is better than I had hoped, now only 50 more inches!

Yesterday I embraced autumn with my first seasonal pie.  I can’t call it Pumpkin Pie because I don’t actually use pumpkin and Butternut Pie doesn’t have the same ring to it; but, that’s exactly what it is....baked butternut squash makes a wonderful pie and I think has a much better texture and less bitterness than pumpkin.  My spider web was a bit messy, but oh so tasty!

The garden shot for today is  Leycesteria formosa commonly called Himilayan Honeysuckle or Fowering Nutmeg.  This is an amazing plant that is in flower for most of the summer and keeps the pollinaters very, very happy.  Then in the fall it produces these beautiful berries in hanging clusters.  Surprisingly the fruit is edible and tastes a bit like chocolate and kind of like molasses.

Monday, October 21, 2019

Weaving To Frame

I have been home for a couple of weeks now, and I’m ready to jump back into my weaving.

South central Spain was amazing and The Great Mosque of Cordoba was probably one of the most beautiful things I have ever seen.  The Great Mosque was begun in 784 and when the Christians conquered Cordoba in 1236 they built a cathedral within the existing mosque.  This place is massive and the Cathedral was built without demolishing the existing Mosque, it is a stunningly beautiful and wonderful place.  The other places that were beyond expectations were The Royal Alcazar in Seville and the Alhambra in Granada, but after weeks away, it’s always nice to be home.

Now back to what is on my loom.  I belong to a study group within our guild, called Exploring More and our challenge this time is to design, weave and frame a piece that could be displayed on a wall.  Sounds easy, right?  I thought so too when I suggested it.
I started looking for things I wanted to weave and the more I thought about it, the less sure I became.  Finally, in a bid to get something on the loom I put on a natural 2/16 cotton warp 2 yards long with 280 ends, 10 inches wide on the loom and sett at 28 epi.
I threaded the loom in a 1-2-3-4 twill and tied up the loom with some options.  Then I went to Spain to enjoy the sunshine.  I have tied the treadles to weave plain weave, treadles to weave twill, treadles to weave dukkagang and treadles to weave basket weave.  I know, I’m really hedging my bets!
Now that I’m ready to begin I went searching for something that would look good on my studio wall; and since I love flowers I started there.  In my dining room I have a lovely watercolour of tulips and that was my inspiration.  I love that this painting is just a suggestion of tulips rather than being too literal, so right up my alley.
I still wasn’t sure how I wanted to weave the tulips so I took some coloured sharpies to the warp to rough in the general shapes.
I’m sorry that I didn’t photograph my efforts so far, but first I started just laying in colour in the general shapes I wanted using the Italian inlay method.  It just looked lumpy and bumpy, so that came out.  Then I started laying in colour blocks in a tapestry method and that was just far more work than I was willing to do, so it has all be pulled out too.

As it stands right now, I will use the natural 2/16 warp cotton and just weave this off as plain weave, then I plan to paint over my rough outline and perhaps do some embellishments.   Hmmm, I have a feeling that going at this all loosey-goosey wasn’t the best idea.  I still have lots of warp to play with, so that's my task for the next few weeks.

The garden shot today is a photo of one of the front garden beds in full autumn glory. It is Dwarf Fothergilla (Fothergilla gardenii 'Mt. Airy) with Japanese Silver Grass (Miscanthus sinesis 'Sarabanda' in behind.

Monday, September 23, 2019

Finishing the Piano Scarves

By the time I got to the third piano scarf I had the pattern memorized so it wove up quite quickly.  I also think that the boat shuttle really helps with speeding up the weave time.  It is a Little Man Howell which is 15 inches long, the bobbin is 8 inches and it can hold enough chenille to weave about 40 inches.  I got it by chance with an AVL mechanical loom purchase, the loom is long gone but the shuttle has stayed!
I don’t do a lot of long warps so I was a little surprised by the thickness of the scarves around the cloth beam by the end; my knees were almost touching the roll.
After taking off the scarves for washing I noticed the thick layer of dust on the race of the (reed holder).  After seeing that I went around my loom with the vacuum! Talk about dust bunnies!
After washing the scarves I put them into the drier with some towels and felt dryer balls.  It's really nerve wracking but the softness and drape of the finished scarves is worth it.
The scarves then have their hems pinned up; here they are waiting for sunny days so I can have enough light to hand sew them.  Here on Vancouver Island  during the first week of September we had the average rainfall for the whole month. It has continued to be a dark and wet month, buckets of rain today again!
Here are the final beauty shots for a piano scarf.  For Sale.

I haven’t shown you the final beauty shot for the yellow and red brown Tencel scarf (previous blog about it).  It is really something very special and wonderfully autumnal.  For Sale.

Final garden shot is a blue passionflower (Passiflora caerulea).  Our neighbour has the original plant on the other side of the fence, but, since it has put runners into our back garden which have rooted, and now the runners are blooming, so I'm claiming it!

Monday, September 9, 2019

Piano Scarves

I meant to weave these piano scarves earlier in the year but I've finally got them on the loom now.  In the spring I placed an order with Brassards for some more white chenille, as I didn’t have enough left in the stash do make a piano scarf warp; it really takes a lot of white chenille.

Last week when I pulled all the chenille out of the cupboard, I found that I had a little bit leftover from last time that I wove these scarves which was also from Brassards.  So, I eyeballed the old cone to the new cone and it looked like it matched, you don’t really expect white to be that different.  Well it was really different; the little leftover cone is really creamy next to the new chenille as you can see in the photo below.  Unfortunately I didn’t find out until I had finished pulling my warp, while it wasn’t very many ends it was long, over 7 yards which is long enough for three scarves.
So I pulled everything off the warping board and started again.  Although, I first had to check my math to make sure that I had enough white chenille for all three scarves.  Luckily, I do have enough white chenille.  After all that everything went smoothly and I have just finished my second piano scarf.  Tomorrow I will start the third and final scarf.
I’ll show you the finished scarves next time.  For now I have the creamy white chenille sitting on the mantle in the studio while I am trying to think of a cool project to do with it.  I am hoping that I have enough to do a black piano scarf; I think that it would be cool.
Final Garden Shot is Himalayan honeysuckle (Leycesteria formosa).  The plant is over 6 feet tall and the long burgundy bracts have both white flowers and purple/brown seeds that are edible and taste like treacle.  The honey bees just love this plant; it blooms from late spring until winter.

Friday, May 19, 2017

Creamy Shawls in Broken Basket Weave

When Microsoft changed my Windows 7 to Windows 10 some pictures disappeared into a weird folder and I just found them so here is the post to go with the missing photos.  If it seems a little familiar I think that I weave these creamy shawls every year.
The warp is enough for two shawls and it is 2/20 Tencel/Cotton blend in Natural with a white Rayon knop yarn.  This time I had some trouble with the warp even though I followed my own instructions.  The reed that I usually used pulled the knops on the rayon and even frayed the 2/20.
I had to change to a larger reed that would let the knops through.  But that lead to the problem of the 2/20 threads being sleyed three per dent and having reed marks show up on the shawl.  The threads almost look braided together.
The solution was to weave about two inches and then move the threads by hand with a needle into the correct spots.  It was very slow going but I had a time line for this shawl because it was a custom order.
This shawl also had the additional problem of the right hand floating selvedge shredding.  So I had to pin another floating selvedge on but I left the pin head sticking out a little bit and I looped the weft over it twice!  Sometimes it seems that I spend more time unweaving then weaving.
The shawl gets cut off and finished to meet the time line for the custom order.  It is really pretty with the freshwater pearls and seed beads in the fringe.  It was sent to a lady in Australia and she loved it!
For the second shawl I didn’t change the reed, hand manipulating the threads worked and you couldn’t see any reed marks in the finished shawl.  The trick was to not weave too much and run the needle along the thread gently moving it into a more open position, almost like strumming a guitar.
This time I managed to loop the weft around the paper clip temple three times!  More unweaving.
I did make a rather terrible mistake on the second shawl.  I stepped back from the shawl and noticed a weird line going across the second shawl.  The weft thread had gotten thinner at the end of cone but I didn’t notice it until I had woven it into the shawl.  The mistake was that I left that line of thread in; I thought that it would bloom in the water and you wouldn’t notice it.
Well it didn’t wash out and it was noticeable in the finished shawl.  I should have pulled it out but I didn’t so I had to figure out a way to fix it.  First the shawl had to sit in the cupboard for a couple of months.  But then inspiration struck.
Mum came up with the idea of doing an embroidery stitch on the shawl.  The stitch is called Scroll Stitch and it looks like little knots going across the shawl.  The thread used is a fine cotton and silver thread that adds a little extra shine to the shawl.
The finished design was four lines of silver stitching that are four different lengths.  The back of the Scroll Stitch is a plain vertical stitch but it does add sparkle.
The shawl is quite pretty and the Scroll Stitch is very subtle when the shawl is being worn.  For Sale.
Final Garden Shot are large purple Alliums - they are a new addition to the front garden and they make quite a statement!