Monday, November 25, 2019

Handmade Christmas Ornaments

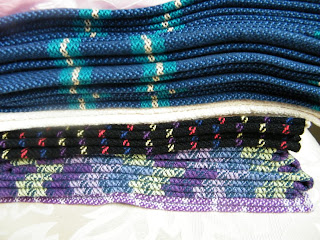
I have two scarves that I wove a long time ago, I love them but they are very short and very purple, but they are also very cute with lace butterflies.  I decided that it is time to do something else with them.
I have the idea to turn them into Christmas ornaments.  I tried to find some wood ornaments that I could cover but they were all too small.  The butterfly motif is 3 ½ by 3 ½.  So I decided that I cut my own shapes out of foam board and cover the back of the ornaments with decorative paper since I don’t have enough fabric to cover the whole ornament.
I used some cardboard to make some test pieces to see what size I wanted to make the ornaments.  Definitely the bottom one, the bigger the better!
I cut a test piece of foam board, then I cut a piece of test fabric from a scarf that just wasn’t woven well enough, my beat changed from really hard to just a gentle tap by the end of the warp!
First thing I learned was that my fabric was too short to go around the ornament.
So I cut off a ¼ of an inch.
I used school glue to attach the fabric to the foam board and I clipped the corners to reduce the bulk of the fabric.  I think that it worked out pretty well.  The glue attached the fabric well and it didn’t soak through the fabric.

I tried another ornament; I wanted to perfect the corners.  I made the foam board a little smaller and was more aggressive with cutting the corners.

The corners are definitely better on this one.  I think that they are cute, they look like little presents.

But I think that the ornaments don’t really suit the butterfly fabric.  So the new idea for the fabric is cards.  The pre folded card stock comes in three or four different sizes.  I used paper to see what size of window will work for the butterflies.
Today the card stock arrived!  Soon there will be butterfly cards.
Final Garden Picture is a Littleleaf Sage (Salvia microphylla 'Hot Lips') it is still blooming even after a couple of frosty mornings.

Monday, November 18, 2019

Weaving to Frame Part Two

I wish I could say I’m finished with this project, but alas, no.  It may be one of those never ending frustrations.
The tulips have been woven off and, man are they ever literal.  I had wanted to create a suggestion of tulips, a mere hint of tulips, but nope, didn’t work, I made a picture.  I was hoping that after spraying liberally with alcohol that the image would bleed nicely and tone itself down.  Nah.
This is the reverse side and it has more potential, but I think I’ll set it aside for now and move forward with another idea.  Thankfully, I put on enough warp to try out several ideas.
Idea number two is all about distortion, so I started to move the threads around, a pull here, a pucker there..
I really started to like the look so I introduced some ruching for more vertical distortion.
I decided to add a few silk threads in gold and green woven through the largest distortion pull.  I’m rather liking this.
I think I’m happy with this look and now I have to find a name for it because that is part of the guild’s project guild lines.
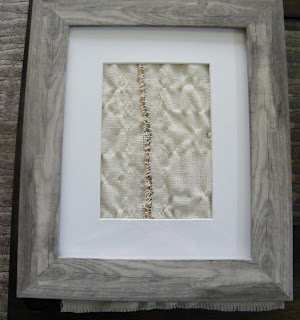
I’ve laid the frame that I plan to use over top of the piece which I’m calling a rather uninspired, ‘Silk Road’.  It definatley looks better in a frame!  Now I just have to figure out the orientation, horizontal, vertical or a radical diagonal?

Thankfully, I have enough warp to give this problem one more attempt, but I’m already pretty much over it.
The garden shot this week is a photo of how we winterize our grasses.  We have eight large grasses in the garden and 'stooking' them keeps the rain off their hearts and protects them from the frost.

Monday, November 11, 2019

Getting Ready for A Sale

November is when we have our weaving guilds biggest event.  It is a two day sale, called Elegant Threads.
The funds raised by the Guild commission at this sale is essential to the Guild’s financial health so Ngaire and I always put in our weaving and lend the Guild our display racks and manniquins.
Frankly it is a huge amount of work to get ready for this event.  The first step is deciding exactly what to put in the sale. Everything has to be pulled out of storage and inspected and discussed.  Our spare bedroom is a disaster while we get organized.
The Guild requires us to use the Guild designed hang tags on every item.  We have tags for hand woven items and tags for handspun and knitted handspun items.    It takes a good day to print off the tags on cardstock, cut them apart, hole punch each one and add string to the tags, all the while I keep my fingers crossed that my printer doesn’t have a wobbly!
The guild provides us with an inventory sheet template, and we fill in our code number, item name (which is the same as on the hang tags) and price.  We keep one inventory sheet for ourselves and give one copy to the sales desk when we drop off our submissions. Each tag must have a unique number, so it is really hard to reuse tags from previous years and still maintain numeric integrity on your inventory sheets.  The part of the tag with the unique number is cut off when the item is sold and used to update the inventory sheets.  I do quite a bit of fiddling around to try and use the old tags and I spend far too much time avoiding rewriting and reprinting tags!
Each item has to be ironed and folded in a specific manner per the Guilds request; for example each tea towel has to be folded into three lengthwise and then the tag must be attached.  No other tags are to be on the item.
One tea towel down, twenty to go.
 I don’t even want to talk about the scarves, the shawls, the runners (which must be rolled on a cardboard tube for display) and the skeins in their basket which have to be measured for length and weighed!  It will surely take us another couple of days to get ourselves ready.
The front garden is much more sombre place today as we remember all those who fought for the freedom we have.  

Monday, November 4, 2019

Something to Frame

I am a part of the same weaving study group as Mom called Exploring More, and this fall the project that we are weaving is to weave something that we can frame.  There is really no rules you can do any weave structure, any fiber, anything really.  It is surprisingly hard to come up with an idea!

I have always wanted to weave a textured canvas (like for an oil painting) and paint over it, letting the paint pool and collect in the texture.  I only have a vague idea of how I am going to do this project.  First step was to find some artist canvases that I am going to use to stretch my fabric over so that  I can then paint on it.

Now that I know the size that I need to weave I can pull my warp.  I wanted to use a fine thread so I used a 2/30 cotton.  Yup I went from Chenille set at 10 epi to this cotton set at 40 epi!
I pulled the warp with no idea what pattern I was going to weave, I just wanted to get started!  The warp is 18 inches wide and 3 yards long, enough for four paintings.
I decided that for the first painting I wanted to weave something with a lot of texture.  I went with an advancing twill that looked like ripples on water.  Of course I made a threading error that I didn’t notice until the end of the threading process.  I had to rethread over 700 threads, yikes!
While I was busy weaving; I heard something fall with a metal clink.  I looked down and I saw a huge screw had fallen out of the bar that holds the treadles to the loom.  Thankfully it screwed back in with no problems.
The pattern is really adaptable; you don’t really have to follow the pattern exactly.  The woven piece is only 22 inches long so I was able to just weave the piece with no repeat.
I washed and dried the piece because I wanted to remove the reed marks from the cloth.  I ironed it really hard to remove the wrinkles.  Here you get to really see the watery ripples of the pattern appear.
Next step is to staple the fabric piece onto the art canvas.
The hardest part was figuring out how to do the corners.  I’m still not happy with how they look.
But the finished canvas looks pretty good!
Last step is painting the canvas.  I chose to use acrylic paint because you don’t have to prepare the canvas, you can paint over the raw fibres.  I didn’t want to use gesso to fill in the texture of the fabric.  I wanted a modern look to the painting with just one bold stripe of colour.  I had too much paint on the brush so there is a big glob of paint and I hate that I applied the paint on the diagonal.  I tried to balance it with more paint but still hate it.
So I added more paint, now I hate it more.
I like the light areas where the paint picks up the woven pattern.  But I hate the dark globby areas.

I am not sure where I am going now; do I work more on the painting or just leave it as a failure that I learn from?  Should I keep going with the other painting ideas I have for the warp or should I just weave something else with the warp?
As I am writing this blog I think I may have a solution for the blue painting.  Maybe I could paint it all over blue then use silver paint to dry brush over it to bring back the woven texture of the painting.  Maybe . . .

Final Garden Photo is flowering plants, it may be November but we still have some plants flowering.  They will keep going until a heavy frost.  They are Anise Hyssop (Agastache foeniculum), Wand Flower (Gaura lindheineri) and Garnet Beardtongue (Penstemon 'Garnet') and peeking around back is Alyssum.