Sunday, December 21, 2014

Crackle Weave - 8 Shaft Silk Scarf

After thinking that I’d woven all the hand painted silk warps ~ I found yet another one!  This scarf warp was painted 2/3 fuchsia and 1/3 moss green.  Amazingly, they look fantastic together!  I’ve threaded it with a very big crackle pattern on 8 shafts; one that Ngaire has woven before.  I love the interesting shape of the threading on the loom.
The weft choice was pretty easy on this one ~ dark marine blue kept the fuchsia nice and rosy and kept the moss from being too yellow.  It wasn’t too far into the pattern that the iridescence really started to show up and I was thrilled.
As soon as the scarf was off the loom a significant selvedge problem became apparent; even though I’d used floating selvedge ~ these were a horror!  Where the pattern carried weft floats near the selvedges, there is a very discernible bump outward.
I’ve also inadvertently sett the scarf too loose.  My notes said 28 epi; but in my pre-Christmas daze I sett this scarf at 24 epi and that created the selvedge problem!
Other than my selvedge problem, I love the pattern on this scarf.  The pattern repeat is 216 picks long, so it is wonderfully interesting to weave and the scale of the pattern stops it from being too precious or fussy.  I think it has a wonderful contemporary look.
Now that the scarf is done I have three fix options for the selvedges.  The first is to do a fancy blanket stitch edge, similar to a hand rolled scarf edge.  The second is to a crochet line edge (not anything fancy).  Third is currently my favourite and that is to make a long twisted cord and attach that to the selvedge; I've done this before sucessfully.  Hmmmm, I guess I’ve got some thinkin’ to do!

We wish you a Merry Christmas season and send our hopes for a Happy and Healthy New Year. 

This garden shot is of a planter of Trailing Rosemary that is outside on the patio ~ can you see the flowers in bloom on December 21!  Love it!

Wednesday, November 19, 2014

V Scarves or the Absolute Disaster

We pretty much always share our successful weaving projects, but rarely share our failures ...not so today!

The idea of a V scarf is that part of the scarf is woven and then cut off the loom.  The warp is tied back up and the other half of the scarf is woven and at the end of the scarf the two pieces are woven together to make a V shape. But that's not quite what happens here!

The first thing to do with this scarf is to pull a striped warp.  I chose to go with bold stripes in pink merino wool with grey and cream in merino/silk blend. Mum went with more and thinner stripes in brown merino/ silk blend and orange and cream merino wool. 
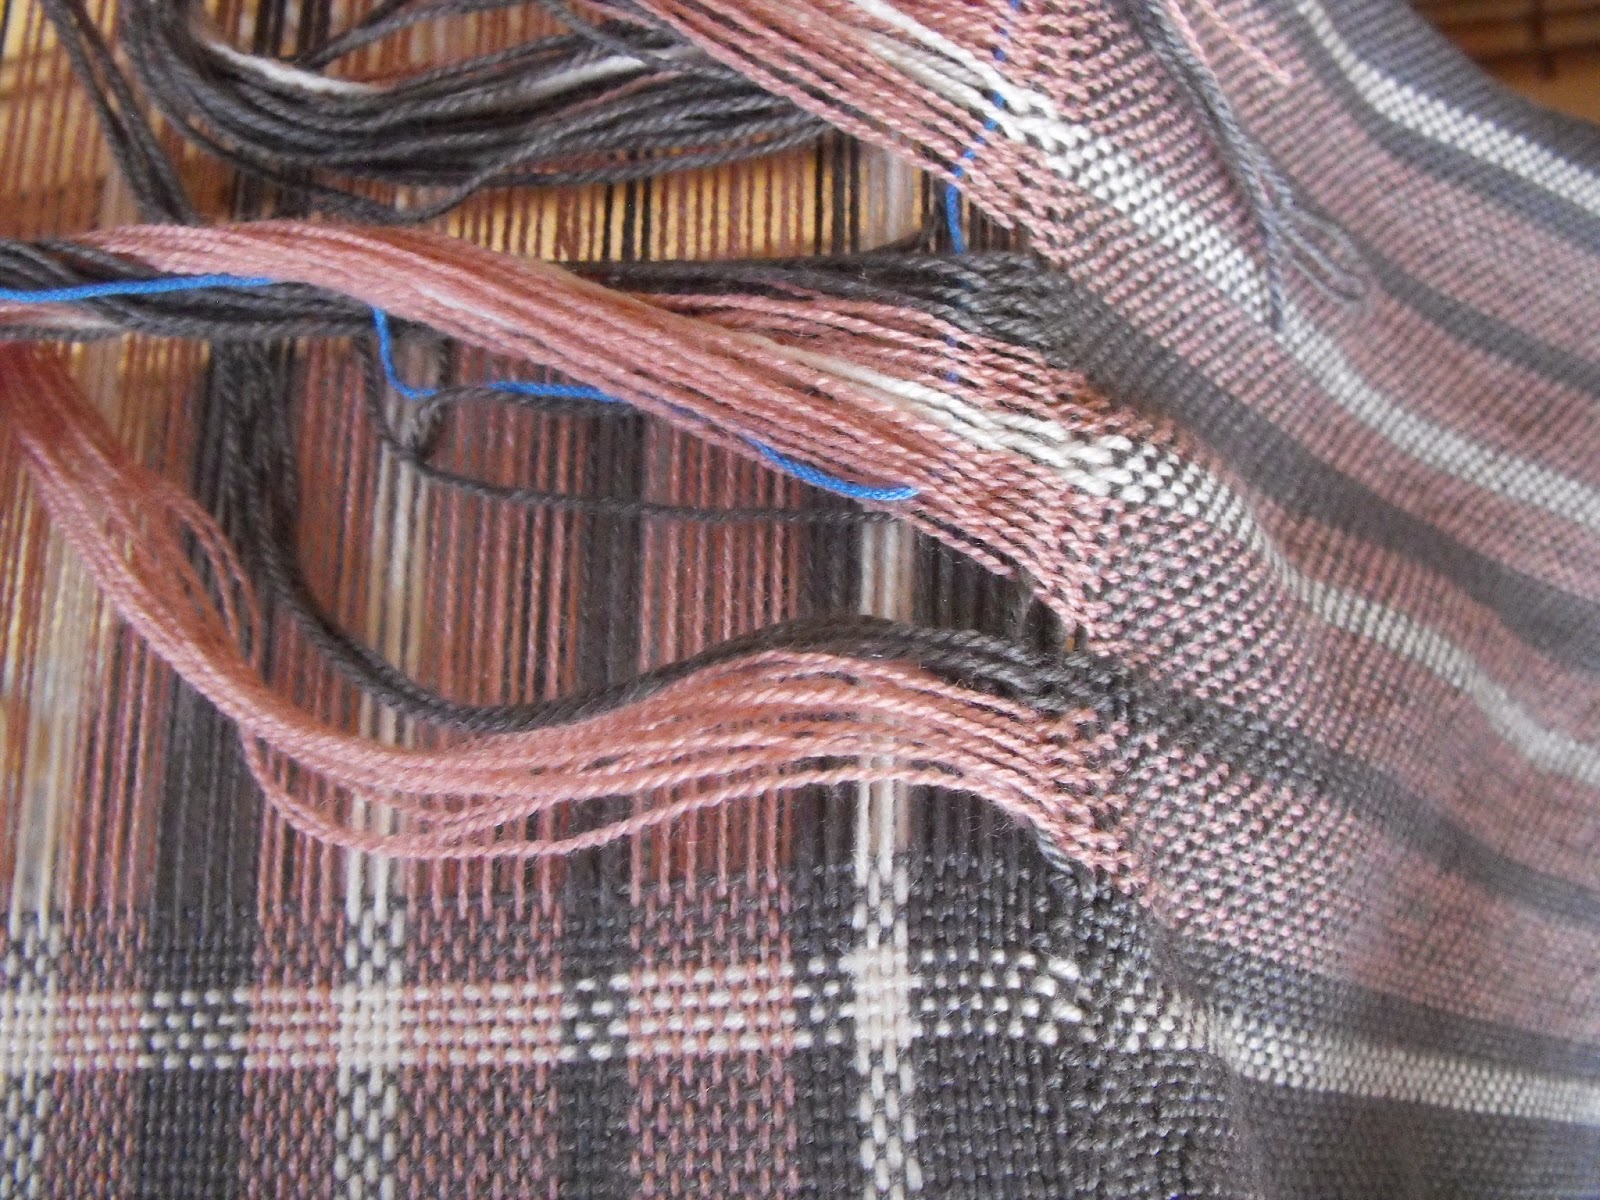
This grey and pink photo shows the first arm of the scarf woven, you can see the filler to keep the open edge tidy; this is the side that is going to be woven into the V shape.  Venetian blinds were used to count off the 17 inches needed for the V shaped plaid  section to be woven later. 
The warp gets tied on again and the second arm of the scarf is woven.  Now is the start of the interesting part weaving in the first arm.  The extra filler is removed from the open edge and small bundles were made to keep the threads tidily tucked away and in order. 
We both had a difficult time with weaving the V shape plaid, it started out really well, but soon disaster loomed (pun intended). 
It became increasingly difficult to line up the scarf edges so that the butting edges weren't too tight and crammed the join; or too loose and sleazy.  The first inch was unwoven so many times that it started to fray the warp threads.
The beater bar also contributed to the mess; as it was pulled against the fell of the cloth it would crush the web of the already woven arm of the scarf and that created puckering and ended up pulling and waving the plaid lines. We both also had some problems with the last thread on the already woven section migrating away from the fell of the cloth and so the whole thing got worse and worse!
I even tried to beat with a hair pick, to push the yarn in instead of using the beater bar.  It did make a better transition and the plaid lines were straighter but it was a different beat and as you can see in the photo it puckered too!
With hindsight part of the problem was the yarn choices, the merino/silk blend was slightly larger in grist than the plain merino wool and the merino yarn was definitely more springy than the merino/silk blend.  I think the sett also contributed to the problem, these scarves were sett at 18 epi and I think a looser sett may have worked better.  After many, many, many attempts at managing the beat to account for the grist and sett differences, we decided to bail and to admit defeat and to literally cut our losses!
In the garbage they went and we both heaved a huge sigh of relief....
The closing garden shot was taken last week before the frost came and killed the lovely pink Chrysanthemum (Sheffield Hillside Pink).  In the foreground is a Golden Smoke Tree (Cotinus Coggyria 'Golden Sprite') and Maiden Grass (Miscanthus sinesis' Morning Light')

Monday, November 17, 2014

Caribbean Blue Tea Towels

This is what happens when you pick colours on a grey stormy day!  These tea towels have lots of pretty Caribbean colours – turquoise, peacock blue, leaf green, navy, yellow and white.
I wanted to get more photos while I was making of this set of tea towels, yet I managed to take only two!  Here is the warp through the raddle at the top of the Louet Spring Loom in all its brilliant blue glory.
While weaving the tea towels I use a tape that is marked into sections to keep my tea towels all the same length, the first mark is at 1.5 inches which is my hem, I also weave in a piece of sewing thread to help delineate this place because it will eventually be the fold line.  The next mark is for the plaid border then the main body and then the marks reverse for a total of 36 inches.
The tea towels get machine washed and dried an then I cut them into individual towels.  The tea towels are steam pressed flat then taken to the ironing board.  The first pressing is at the sewing thread line, and then the thread is taken out.  The raw edge of the hem is tucked into the ironed line pinned and ironed flat.
Here are all the Caribbean Blue tea towels and their plaid patterns.  They are so bright and cheerful.  They were a joy to weave and are going to be a joy to use for someone.  For Sale.

Parting shot of the garden is of the Beauty Berry Bush (Callicarpa bodinieri 'Profusion') which is living up to it's name!  Every year it gets bigger berries and is more spectacular.

Friday, October 31, 2014

Black, Grey and Red Tea Towels -8 Shaft False Damask

It is that time again!  For some reason every autumn I get the urge to do tea towels. WovenBeauty's best selling tea towels are these black and grey towels with a different accent colour each year, this year the colour is raspberry red.
These tea towels are such a fun weave that I didn't get many photos of the process.  But here are the pirns showing the colours that I used for the plaid borders.  Off to the side you can see some of the empty cones that a tea towel project always produces.
Part of the fun of weaving tea towels is the buildup on the cloth beam, that sense of accomplishment as the tea towels pile up neatly.
I put enough warp on for six tea towels plus a bit extra; well, at least I thought that I had.  As you can see I wove past the heddles on shafts 9-12 and up to the heddles on shaft 8 in order to squeeze out the final towel.
Thank goodness for the low profile on the Schacht-end feed shuttle; I had really no shed to speak of but I needed to squeak out the last few inches for the hem of the tea towel.  I had about 2 inches before the reed ; it was really tight.
But the tea towels came out spectacularly!  Each tea towel has a different plaid border, but they all line up beautifully.  For Sale.

The garden shot for the end of the post is a purple Chrysanthemum, which was flattened the very next night by the beginning of our 'Storm Season'....apparently we don't get winter her on Vancouver Island!

Friday, October 17, 2014

Six Shaft Crackle Weave ~ Oil Slick Scarf

I’m still slowly working through the silk scarf warps I painted last year ~ who knew it would take me sooooooo long to get through them!!
This warp was not the most promising because it was basically the ‘use up’ of all the left over dyes. I kept picking it up and then like a magpie, putting it down again when another, more exciting warp caught my eye.
Even on drying out day I put it on the end because it was so drab!!!
I had developed a 6 shaft networked turned crackle weave pattern a while ago and this warp was going to be the maiden voyage for it. Once I had the warp on the loom, I felt much more hopeful as the amazing colours popped and I immediately knew that I had several choices of weft.  The warp has plum, fuscia, green, blue….I was spoiled for choice!
My first weft choice was soft plum ~ not so good.  Then onto cedar green ~ my favourite so far; finally I tried lemon grass ~ yup this was the winner!
Well, it was the winner until I got a few inches woven and found out that the weft absolutely killed the pattern!  My usual weft conundrum!
As soon as I tried the purple I was gobsmacked….this looks like an oil slick on water, stunningly beautiful!  The rounded crackle drops just enhance the oil slick theme.

I was so pleased with this scarf that I emailed this photo of the unfinished scarf to my friend Susan telling her that I thought it was the most beautiful of the silk scarves.
Susan now has a new winter scarf and this scarf takes the record as the fastest scarf in an out of Etsy for me ….ever!
We have the most amazing sunsets here in Comox!

Thursday, October 9, 2014

8 Shaft Crackle Weave ~Gold and Blue Silk Scarf

For me this is the last of the hand dyed silk warps from last summer.  I dyed it lengthwise using 2/3 moss green and 1/3 navy blue with the two colour encouraged to blend along the centre  edge.
The weft auditioning is always hard with these warps you just never know what colour is going to work.  The first three colours are creamy silk, gold and rust.  The idea behind the cream was the hope that it would look like waves crashing onto the beach – nope.  The rust was for an autumnal feel – nope.  Surprisingly gold was the best!
The pattern is the same crackle pattern from the limegreen silk scarf, but it looks totally different with this scarf.  The moss green blends into the gold making a lowlight which almost makes the pattern almost appear 3D, so pretty!
This is a stunning scarf the colours are truly magnificent!  For Sale.
I absolutely love the lengthwise colours of this scarf; I would totally do the dye plan again!
Garden photo is the Golden Hops.  It is blooming and filling up the trellis beautifully!

Tuesday, September 30, 2014

Blue Ivy Katazome Shawl

This second shawl sat around for a few weeks before I finally came up with a dye plan. The story about the weaving the two shawls can be found here on a previous post.  

My idea was to use a stencil to dye a pattern onto the shawl; but ...the problem is that we live in a small town on an island and I couldn’t source any dye thickeners locally that would work with the Procion MX.  I really didn’t want to drive three hours to Victoria or wait for an order from the internet or take an ocean voyage to go to the mainland; so the only course of action was to find a DIY alternative on the internet. 

I stumbled upon katazome which is a Japanese dye technique using a resist paste applied to the cloth.  The best part is that the resist paste is rice flour, and that I could find!  A little research later and I found that wheat flour can also be used ...even more awesome!

So here is how I did it for the first time – no sampling/testing just straight onto the shawl!  First I washed, dried, ironed and trimmed the threads from the shawl.  I left the fringe untwisted.
I made a table long enough to hold the shawl and the fringe.  I used a piece of firm insulation on top of some boxes to extend the sawhorse table!  Then I covered it with a large piece of plastic sheeting, like the stuff used for painting drop cloths.  I made sure that there was enough overlap to wrap the dyed shawl.
The next step is to make the paste.  I used ½ cup all-purpose flour and ¾ cup of water, adding more water to get the right consistency.  You want a mixture like thick cream, not too runny but not too thick.
I did a test run on the kitchen counter to make sure that it was able to hold the shape of the stencil and it looked good!
We (Mum and me), measured out the halfway point of the shawl, marking it with a pin.  We then figured out the placement of the stencil and found out that we would need to flip the stencil over so that the ends would match (having the end ivy pointing down to the edge on each side).  Then it is just a matter of glopping the paste down on the stencil and lightly pushing it around using a small offset spatula.
For the centre motif I didn't want to use the whole stencil so I just taped off the areas I didn't need with painters tape.
The shawl had to be left overnight so that paste could dry.  It was weird to see that when the paste dries it pulls and puckers the shawl. 
So the next day is dye day.  The first step is to make a solution of soda ash and water.  I used 2 teaspoons of Soda Ash with 8 cups of warm water.  I only needed about 1 cup for the shawl but we were able to use the rest of the dye to dye some silk yarn.  I sprayed the soda ash solution all over the shawl until it was wet but not soaking.  And I left it for 20 minutes, at about 10 minutes I gently pulled the shawl flat and made sure that there were no dry spots.  The soda ash is an important step to dyeing the Procion MX as it activates and sets the dye.
Mixing the dye comes next.  I choose Royal Blue in the Pale value.  The recipe is ½ teaspoon of dye, 2 teaspoons of salt, ½ teaspoon Urea and ½ cup warm water.  Mixed together the ingredients into a cup and then I poured mine into a sprayer.
I sprayed the dye from only one side of the shawl to make an ombré effect.  I only used maybe ¼ cup of dye water, it goes along way! 
When I was happy with the dye coverage we folded the plastic sheet over the shawl for the 24 hours needed for the dye to set.  While the shawl was batching I had mild panic over how I was going to rinse the dye and get rid of the resist paste!!
Thankfully the first and easiest method worked.  I took the shawl outside and used the garden hose to rinse off the resist paste and dye!  The flour paste easily rolled off the shawl and with the small amount of dye used in the shawl it quickly rinsed clear.
The shawl looks amazing!  I really can’t quite believe how well the flour paste resist worked.  I already am looking at the other shawl thinking that I’m going to dye it too!
The final photo shoot for the shop and the shawl looks wonderful.  I love the sky blue colour and the ivy motif is so pretty.  For Sale.
So that is how I do katazome dyeing – a little differently than the traditional technique – but it worked!