Showing posts with label Louet Spring Loom. Show all posts

Monday, January 19, 2026

Apologies

I’m sorry that I haven’t been updating the blog.  I have been taking photos and writing blogs posts in my head but they don’t make it onto the computer.  A lot has changed in the last year but I’m still weaving!  The biggest change is that Mum can’t comfortably weave anymore, it is too hard on her knees.  So we decided to sell one of the two Louet Spring Looms last spring.  

It was sold by word of mouth, Mum mentioned to her friend Susan (from Thrums) that she was thinking of selling and the next day Susan said that she had someone interested.  The lady came over to test out the loom, which I had placed a silk scarf warp onto and we also had tea towels on the second (not for sale) loom so she could see how the loom works with different projects on them.

And the loom has gone to a new home up island from us in Campbell River.  The studio is looking a little empty but the extra space around the loom is nice. 

I do have some posts about weaving coming up but I just wanted to say that Dust Bunnies is still here!  

Final Garden Photo is Erigeron karvinskianus (Mexican Daisy), still blooming in January.


Tuesday, September 10, 2024

Falling back into Weaving

I have seriously been considering selling my 12 Shaft Louet Spring Loom, since for the past ten months it has been idle.  Well, now that my knee pain is under control and I’m feeling perky again I thought I’d give the Spring one more warp to make sure that letting go was the right answer.  We have two Louet Springs in the studio, a Louet Spring 1 from 2008 and the other an Original 1990’s Louet Spring; so we thought we’d better see which one we want to keep.

So Ngaire and I swapped looms and I put a warp on the Original Spring loom.  We thought it would be interesting to see what the differences were and if that factored into which one we should sell.

I put on a painted silk warp that was one of the ones that I dyed last summer.  This was the last warp I made and it had on 132 ends and the dye colours were super subtle.  Well, 132 ends are far too few when the sett for silk is a minimum of 24 epi; so borders were on my radar.

I found a very pretty pattern in the Strickler 8 Shaft Pattern book and built my scarf from there.  I found some silk in a complementary blue colour to bulk out the width and chose teal tencel for the warp. This is the border sequence I chose.

The most notable difference that I noticed in the looms right off the bat is that the Original Spring is made of heavier gauge timber, it just feels more solid and tends to move around less.  The second difference is the distance from the castle to the back beam is about 5 cm longer, not sure why that has changed but there is more headroom when you’re working with the lease sticks.  The third major difference is the braking system which is a tad more cumbersome to use.  Frankly, it feels just the same and actually feels more secure on the floor.

Now, that I’m actually weaving again, I find that my knees are doing great as long as I take a short break now and then so I’m really enjoying the whole weaving process.  Here is the scarf off the loom but unwashed.

The scarf is a joy to weave and I’m really stoked at the end result which is a lovely scarf and as a bonus, I think we’ll hang on to both looms for now because weaving feels fine!

Here is the beauty shot!  For Sale.

Right now the stars of the garden are the grasses and my urns one on each side of the garage at the front of the house.  The flowers are Scaevola aemula or Fairy Fan Flowers and they bloom from June to December.

Monday, January 8, 2024

Louet Spring Loom Maintenance

It is the beginning of a new year so its a good time to do some loom maintenance.  

The first thing I did was walk around the loom with a screwdriver and wrench and tightened up all the bolts and screws.  Don’t forget to do the bench also! 

Next its time to check if the shafts and lamms are even.  As the Louet Spring is a countermarche loom I start the levelling process from the bottom lamms and work my way up to the shafts.  At the end of each lamm and shaft is a black and white end cap that we call the ‘biting penguin’ and in the centre is a roller that you can adjust to lower or raise the lamm or shaft.  Usually there isn’t any need for adjustments.

I then removed all the lamm tie up cords to make sure that they hadn’t stretched out of shape or frayed.  I measured each cord against a new one and removed any that were too long or too short.  For my loom the short treadle cords measure 35 cm long (13.5 inches).  The long treadle cords measure 55 cm long (21 inches), so measuring was a good indicator of stretching.  I marked each one with sharpie to indicate which hole to button.  I also check that the screws that line the treadles are even because if a screw is too far out it can catch on a treadle cord which can halt the action of the treadle.

Next job is to unfurl the cloth beam to check the condition of the texsolv cords and to ensure that the bar is still balanced.  On the Louet Spring the apron cloth is replaced by three doubled over texsolve cords which are snitch knotted onto a metal rod.  The rod is 36 inches long and there are 3 sets of cords, so there will be 4 spaces between the cords; 36 divided by 4 gives 9, so there should be 9 inches of rod at each end and 9 inches between the cords.  When I measured mine they were slightly off because I nudge the knots to one side or the other when I tie on my warps. This could make the cloth beam pull the newly woven fabric onto the beam unevenly. A fairly quick fix to mark these spots and re-centre the cords.  I do the same for the warp beam at the back.

I check the spring tension apparatus and the texolv cords for any wear or stretching of the cords or springs.  

I also check the condition of the texsolv cords at the top of the castle down to the bottom of the lamms.  

And check the brake mechanism for stretched or frayed metal cord.

Lastly I replaced the beater and made sure that it was level.  If your beater is crooked, then your web will beat on an angle.  If it had been off true I would have used the adjustable pivot points at the base of the beater to get it to level.  Then I vacuumed and then lightly wash with just a damp cloth and dry the loom.  I’m always shocked by how dusty my loom is.

So now the loom is clean and reset for the New Year.  I can’t wait to start a new project, and as its January its tea towels.  I have a new tea towel weaving draft for sale, Zinnia Plaited Twill Tea Towels.  It is a 12 shaft twill in fiery hot colours of orange, purple, gold, red and brick.  For Sale.

Final garden photo is the seed heads of a grass, up till now, we have had a mild winter so the grasses are still standing proud in the garden but today we may be getting our first snow!

Monday, February 20, 2023

Four Shaft Place Mats

Finally the cotton and linen place mat warp is off the loom.  I swear it was the slowest weave ever!  I started out with high hopes of doing some serious stash busting and ended up with a weave that I completely lost interest in. 

The idea was to weave some very simple place mats using linen, linen/cotton slub and cottolin warp in neutral beige/browns.  I decided on an eight yard warp to give myself options.  I chose a larger grist of natural cotton for the warp.

I used the spool rack my husband made me  to pull the warp, because the colours and threads were to be random.  I ended up making three separate warps because I wanted less of some colours than others and some of the yarn was minimal. 

Of course each of the warps demanded a different set of lease sticks, so here are the three sets all piled up.  

I used the raddle on the looms castle to do the first basic colour spreading, and it looks a right mess!

Thankfully after all that, the warp pulled on very nicely.

The pattern I used was from A Handweaver’s Pattern Book by Davison called Ribbed Twill.  It is a 4 shaft pattern that has a lovely diagonal with some grouped threads.

It is always so satisfying to see the cloth winding around the cloth beam, knowing you are almost done.

This was one of the messiest warps I’ve done in a long time and there was a lot of vacuuming up to be done.

Here it is off the loom just waiting for me to decide on how to finish it.  Do I wash it in a piece and cut later?  Do I cut it into place mats, then wash?  Do I give a fringed edge with a machined finish?  Do I do a turned edge?  Do I make double across the table place mats or individual ones? Too many questions!

Here is what is keeping me from the loom right now.  We just bought an outdoor pizza oven and we are waiting impatiently for the weather to cooperate so we can try it out.  Apparently it will get up to 500 C and cook a pizza in 1 minute!  There will be wine and cheese when we finally fire her up.

Monday, October 12, 2020

Louet Spring Loom Maintenance

Now that I’ve finished weaving the Fleur de Lis pattern, I have to move the heddles back to where they belong.  That means dealing with the dreaded ‘biting penguins’, so two birds with one stone is the way to go.  I took this opportunity to order some new heddles and some new texsolv cord for the loom and to do some overall maintenance.  I’m showing the maintenance routine for my Louet Spring Loom, but the same principle applies to any loom.

I decided to order 400 new heddles so that the next time I want to do an unbalanced weave again they will be there, ready and waiting.  Jane Stafford Textiles is just one Gulf Island away from me, so I got my parcel the next day, what a bonus.  I also thought that after twelve years of hard work, my loom deserved to have the cords on the spring mechanism replaced; so a 50 metre bobbin of texsolv was added to the order.  Hmmmm free shipping over $250 was just the incentive I needed to order these lovely skeins of 2/20 bombyx silk!

I started by lifting the loom up on four small step stools to bring everything up to eye level.  The loom is lightweight enough that this is an easy job.

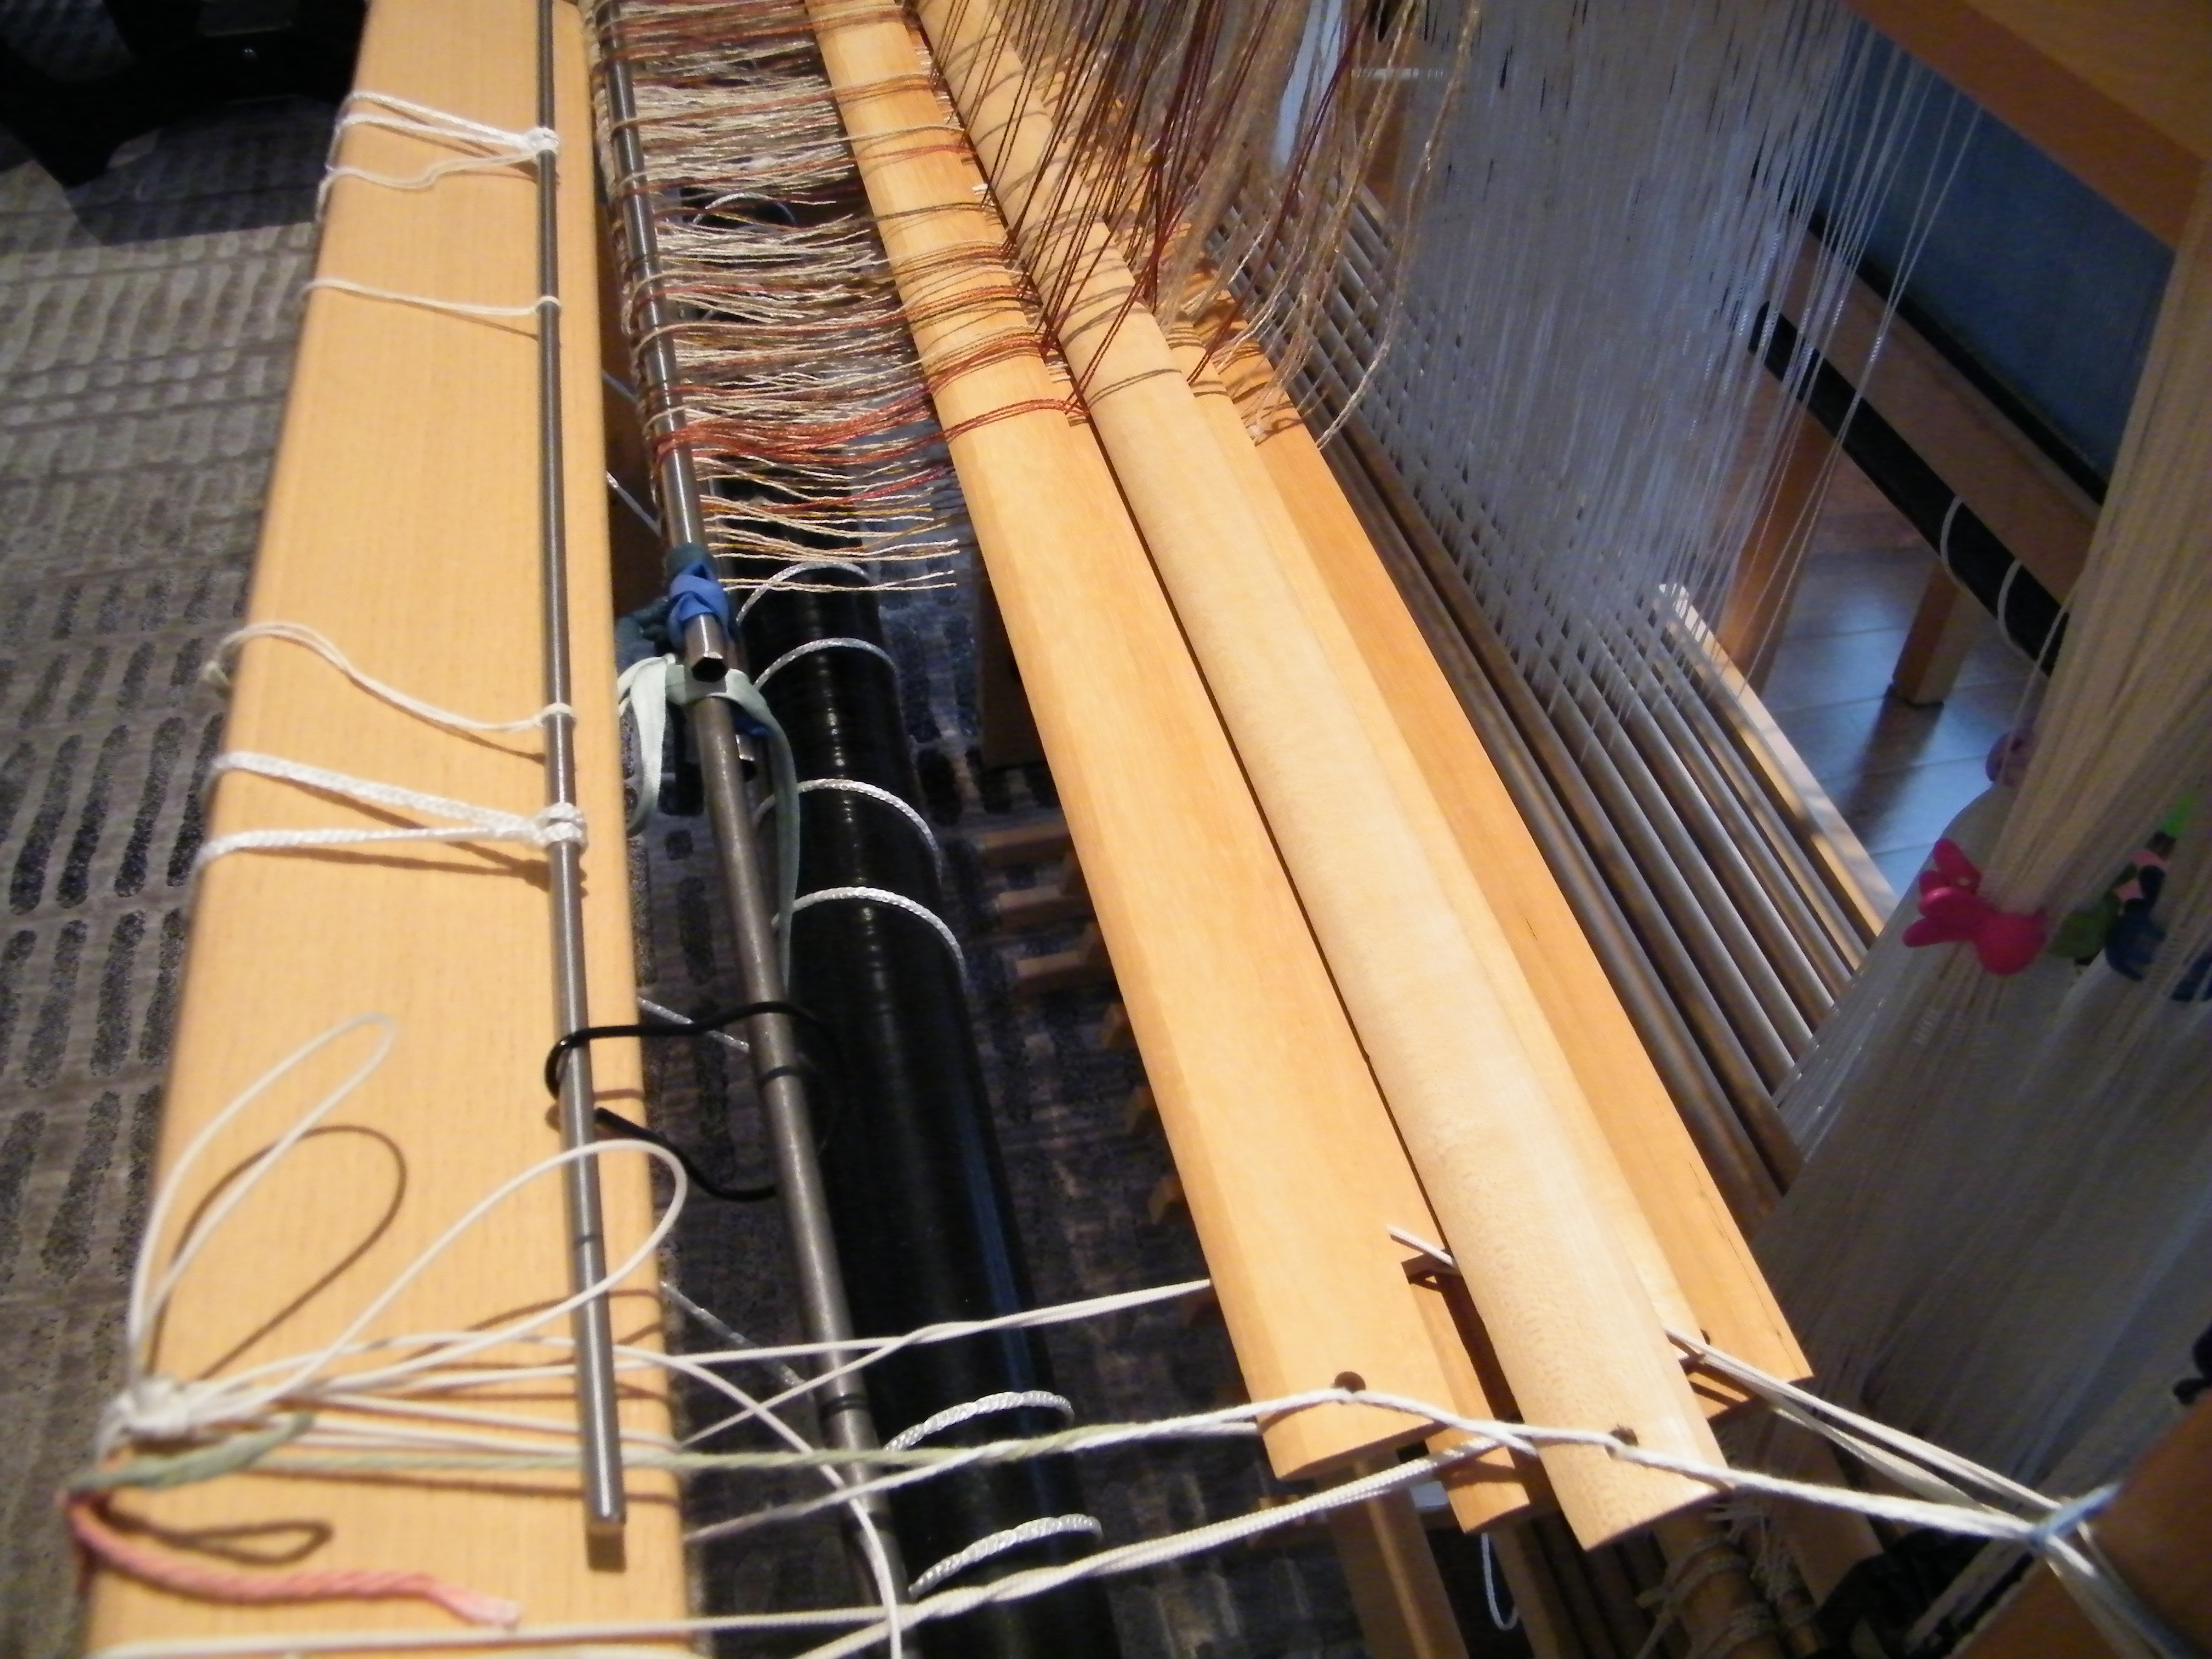
I unfurled the front and back beams to check the condition of the texsolv cords and to ensure that the beam bar was level ~ it’s amazing how just a few centimetres off true can make a huge difference when weaving the fabric web.  I re-centred the cords on the beam bar to level it and it looks good.

I took off the texsolv cords from the spring tension apparatus and cut two replacement cords and attached them to the spring and around the guide and finally to the front of the loom.

I removed all of the treadle cords and checked each one for wear and stretching.  For my loom the short treadle cords measure 35 cm long (13.5 inches).  The long treadle cords measure 55 cm long (21 inches), so measuring was a good indicator of stretching.  I marked each one with sharpie to indicate which hole to button.  Since I have lots of texsolv cord now, I cut myself a few new cords of both sizes. 

 I asked my husband to use his soldering iron to melt the ends on each of the newly cut cords.  I now have 95 cords for each the upper and lower lamms and that should deal with even the most unbalanced of weave structures.  That sounds like a lot of treadle cords, but even a balanced weave on 12 shafts and 12 treadles takes 72 of each size.

I counted all the heddles and removed the hundreds of extras from shaft 2 and 3 and put them back to where they belonged and then I added the new heddles to the first 4 shafts.  I now have 150 heddles on shafts 1-4 and 125 on shafts 5-8 finishing up with 100 on shafts 9-12.  Whew that's a lot of heddles!

Now that the heddles were all in place I noticed that one of the shafts was riding higher than the others so it was time to go back to the ‘biting penguins’ and fiddle with the barrel screw on the shaft to align it with the others. 

 In this case I had to lower the penguin head one bead down on the cord and then loosen the lower part of the shaft, but it looks good now!

One issue I had begun to notice on my last couple of projects is that the treadle cord will sometimes catch on one of the screw buttons on the treadle and then I come to an abrupt halt which always catches me by surprise! 

This can be caused when one screw button is protruding a bit more than its neighbours.  I had Ngaire run her fingers over the buttons and then she tightened any that were outstanding.  Jobs a good’un!

Since I have the loom up on the stools I tied up my treadles for my next project, then down she came and onto my final jobs.

I replaced the beater and made sure that it was level.  If your beater is crooked, then your web will beat on an angle.  If it had been off true I would have inserted a small piece of thin cardboard under the reed to ensure its level.

Lastly I walked around the loom with a screwdriver and a wrench and check if any of them were loose, I’m always surprised that at least one or two screws need tightening.  A good vacuuming is the finishing touch.

Our garden is always surprising us, and one of the Trumpet Vines (Campsis tagliabuaa ‘Indian Sumer’) has produced a number of these huge seedpods.  They are the size of a small banana!

Wednesday, August 26, 2020

Fleur de Lis Diversified Plain Weave Again

 There is so much going on around here that I completely forgot to write about the progress on my Fleur de Lis in Diversified Plain Weave this week.

It certainly has been a voyage of discovery for me beginning with the ‘aha’ moment when I discovered that my treadling was upside down!

I guess that my usual style of pattern motif is symmetrical and this Fleur de Lis is definitely not that.  I printed the treadling off of Fibreworks and got down to weaving and although I thought the motif was weird, I was so focused on the selvedges that it didn’t click right away that it was upside down.

Once the entire motif was woven, it was apparent that I had forgotten that the pattern is pictured on Fiberworks from behind the loom, not from in front of the loom.

I know that it really doesn’t matter in which direction the pattern appears since it will the same from top to bottom on the runner.  I just didn’t like weaving it upside down, it messed with my thought pattern (I really am a linear kind of gal!)  So, I unwove the pattern and re-wove it from the bottom of the pattern to the top and I’m much happier.

Usually I am meticulous about when and how I add new threads to the web, habitually I add at the selvedges.  For some reason,  I decided to add the new fine thread whilst in the midst of the runner.....why, why, a thousand times why?   You can barely notice it on this side of the cloth (about 10 threads to the left of the flower), but I got a glimpse of the other side while advancing the warp and yup, there is was, front and centre!  

As I near the end of the runner, yet another problem has appeared.  My hanging selvedge threads which were made out of the ‘not cotton’ thick warp threads have started to fuzz and fray and snap. 

I have had to re-hang the selvedges twice on the right hand side so, I will be pulling off these ‘not cotton’ selvedges and replacing them with 2/8 cotton for the next runner.

Speaking of the next runner, while I was weaving this runner I noticed that treadle #5 and treadle #14 were the same. I haven't a clue why I didn’t see it before.  Regardless, I went back to the computer and with some fiddling around I was able to amend my Fleur de Lis and make just a wee improvement now that I had another treadle to play with.

I think that the little drop near the bottom of the motif takes it out of ‘possible space ship’ motif and firmly anchors it in Fleur de Lis!

The garden shot today is of the greenhouses’ progress with our Vanilla Strawberry hydrangea (Hydrangea paniculata’Renhy’) in the foreground.