 I wove three of the towels with the same lemon yellow weft that was in the warp. I had alternated two yellows and this weft was one of them. These are really fresh looking and I like them well enough. I knew I had enough weft for these three towels and enough of the butter yellow for three more, but...
 As soon as I changed the weft to this butter yellow I knew this was destined to be the only one, it really looked peachy on the loom and I wasn’t sure I liked it. Turns out this colour became my favourite after washing! Go figure.
  I hunted through my stash and found this darker yellow and so this became weft number three. I liked it on the loom, but found that the stripes came out reading a different colour. I used the same green for my stripes as I used in the warp, but when it crossed this dark yellow it seems to read bluer somehow.
 I didn’t love any of the new wefts and since this was my final tea towel I thought I’d take a chance and I switched my weft to a lime green. The lime had a bit of a blue tinge to it so I though it might work. I’m pleased with this one, it looks fresh and clean and now I wish I’d been brave sooner!
Needless to say I’m not in love with these tea towels and so I thought I’d forego my usual hand sewing on the hems and bring out the sewing machine. I’ve never done this before, but I just couldn’t see putting much more time into these tea towels that are now destined to be mailed to my son as they are the perfect colour to brighten up his apartment.
 I was really careful in my ironing before sewing and pinned the hems in place every 2 inches or so, but find that my stripes are not perfectly aligned, it seems to have gotten progressively worse as I sewed along the hem. Any suggestions on how to avoid this without purchasing a walking foot for my machine? Do I need to pin more frequently? I realize that it is the different speed between my feed dogs and the top layer of fabric, but if you have a fool proof method, please share!
 I also noticed after the fact that I’d hemmed one of the tea towels wrong side up and it’s really noticeable. Seems that this warp is one blunder after another!
 Here they are all together. From left to right is the lemon yellow weft, lime green weft, lemon yellow weft, dark yellow weft, lemon yellow weft and finally the butter yellow weft.
Here’s the draft:


 This is a photo of my studio as it was during the month of tear down – it looks like a bomb went off!
  I find that I’m the kind of person who doesn’t do well in clutter, so the past few months have been very difficult for me.
  But since I’m the kind of gal who likes to plan ahead ~ Ngaire and I pulled a bunch of warps in anticipation of this commotion and now we’ll start working our way through them.
 There are two tea towel warps, 5 scarves and 1 set of placemats to weave while we are tucked into a corner of the room that we are showing as the family room.
 I have a seven yard tea towel warp on the loom right now and I am just finishing towel number four.
  It’s a very graphic pattern for me and I’m able to vary the weft colour and so far have used three different yellows.
  This is a 2/8 unmercerized cotton warp in twill and it’s weaving up really quickly. I love this type of weaving as it gives me a chance to center myself and practice technique rather than concentrating on the pattern.
  I have used a broken twill for the two tone green stripes and two different yellows for the 2/2 twill portion and the broken twill gives a very interesting pattern due to the colour changes. I have also done weft stripes in green beginning three inches from the beginning of each towel to add interest.
 A member of the spinning study group that I belong to is in Nepal right now and so are these two hats. Her group is taking a dozen pair of new hiking boots for the lady guides they are using for their trek and she asked us to knit a wool hat to tuck into each pair of boots. These two are made using Merino and silk. I created the yarn variations by spinning more than five different pinks and purples at the same time. These are so soft; hopefully the ladies who receive them will like pink!
 On the top of the rack are the 8 scarves rinsed, we don’t take out the Shibori threads until the scarves are dried.
 The middle rack has some 1/12 silk that we dyed to go with
  On the bottom rack is some more silk and the skein to the front of the photo is 2/20 Tencel that I am going to use for some bead leno scarves.
 But you really want to see the scarves and here they are. We each dyed one of our scarves the same colour way but they came out radically differently.
 The first set of scarves are dyed jade on one side and robin egg’s blue on the other.
 The second set are dyed red violet on one side and teal on the other, my personal favourite.
 The third set are fuchsia down the centre and royal blue on the edges.
 The last two are for us and I did another pink one and Mum did yellow on one side and royal blue on the other. There was some weird colour mixing on Mum’s scarf so it shows a lot of olive green!
 The scarves are all so different in the dyeing and in the texture that they produced. The plain weave scarves are all about the dyeing patterns. The twill scarves have a lot more texture that even with a hard pressing doesn’t come out.
 I bought the whole stock of this yarn, because I'm a magpie and love shiny things! But what the heck is it? After a fruitless internet search, I decided that I’d better do a burn test to find out exactly what the fibre content is.
 I decided to run the test on known fibres to act as a base line and to ensure that I was doing the burn tests correctly. I chose to burn silk, linen, cotton and this unknown fibre. Armed with my Mary Blacks ‘Key to Weaving’ a box of matches and a plate I was ready for my burn tests.
  Silk was the first under the flame and it should burn with a sparkling orange yellow mantle.
 Silk should burn steadily with a slight sizzle then self extinguish.
  Linen was next in line and it should burn orange yellow and sparkle and crackle.
 Linen then smolders until self extinguishing.
 Cotton burn
 Cotton doesn’t self extinguish.
 Now it’s time for the Chyrsella, my mystery fibre. It exploded into flame and burned with a bright yellow flame and gave off black smoke.
  It burned so fast that I got of small speck of this napalm on my fingernail and OMG I hit the water pretty fast! The yarn ignites and burns very readily and is not self extinguishing and left a tarlike residue. I believe is Acrylic yarn.
 This is the result of my burn tests. It was a fun fibre exercise and I learned how to pay attention to details while you hold onto fire and ~ to always keep a bowl of water at hand!
 I had a bit of cotton warp left on my loom and I quickly wove up a sample with the red Chyrsella to see how it behaved. It stayed on the bobbin very nicely, unlike some rayon which can have a tendency to sproing off the bobbin. When I popped the sample in the water I was gob smacked by the smell! Weirdly, acridly, manmade is the only description that fits. The yarn was colour fast and when dried had no odour and a beautiful soft feel. The odour of the yarn when wet is something that I don’t think can be overcome, so this yarn will never be used in garments or table linens. I now have some very beautiful yarn that will be dedicated to weaving cards or wall hangings or whatever I can come up with…..but ohhhhh it’s so pretty!
 Shibori is a traditional Japanese technique for dyeing cloth by stitching secondary threads into fabric and pulling the threads in a manner similar to smocking. After dyeing the secondary threads are pulled out. In woven Shibori the secondary threads are added during the weaving process instead of afterwards by hand. The weft for the scarves is natural cotton and the Shibori threads are Orlec. I learned that if you are doing a pattern with the Shibori picks it is best to use a colour that you can see; it helps to minimize mistakes as the pattern really shows clearly.
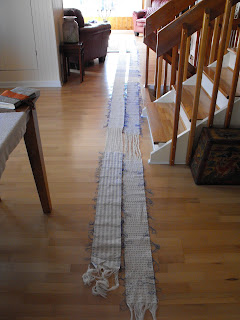
 The 10 yard warp is enough to do four scarves and two 12 inch samples. For each scarf I tried to do different 8 shaft twill treadling for the background in the natural cotton and a different twill pattern for the Shibori pattern picks. Mum was doing plain weave background with Monks’ Belt for the Shibori pattern on 4 shafts so it went really fast, so fast that by the time that I had done two scarves she had done four scarves! The finished scarves stretch from the living room to the dining room.
  Here is a closer look at two of the scarves, the one on the left is mine and the one of the right is Mum’s. The loops on the side are the Shibori picks and are used when gathering the scarves, like smocking.
 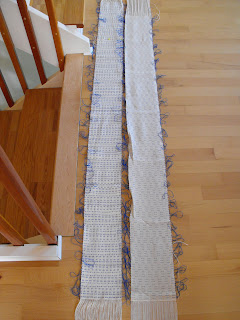 We had used the cotton before for dyeing and noticed that it had quite a bit of spinning oil that tended to discolour. So before we twizzled or gathered the Shibori picks we washed the scarves. We did this only because of the oiliness of the cotton. The samples on the top have not been washed and you can really see the difference.
  We wanted the fringe to also wash clean so we loosely braided them. After washing and drying we had to twizzle the fringes. Eight scarves and lots of little twists makes for a long two days of twizzling, thank goodness for a quadruple fringe twister!
  The scarves are now pulled and ready for dyeing. Before gathering they were five inches wide and now are about one inch wide.
  The next blog post is going to be about the exciting part, the dyeing and the reveal of the finished scarves.
 Isn’t the scarf stunning?! I haven’t done a lace weave in a long time so I went looking for an idea and saw this butterfly in Best of Weavers – Huck Lace. The original draft was done on a 16 shaft loom and needs 17 treadles but I modified it using PCW Fiberworks down to 14 treadles, just perfect for my 12 shaft loom. The butterfly motif looks similar to the one in the book, but by shaft switching and modifying I really simplified and tightened up the motif. I wanted to make these scarves for summer wear so I modified my width and length. I chose to weave the scarves 5 inches wide and 50 inches long, this is a full 20 inches shorter than my usual scarf length. The warp and weft for my first scarf is 2/8 Bamboo in Red Violet.
  The butterflies are the star of the scarf so I wanted to have the warp and weft the same so there was nothing to distract the eye. The butterflies are quite large at almost 4 inches so I had a hard time figuring out placement. Finally I decided that I needed a strong visual; so I cut out pieces of paper in the correct size and measured out the length of scarf I wanted and played until the spacing was right. The scarf I used is one my mother made me in Italian silk ribbon and Tencel – pretty eh?
  One thing with doing an image on a scarf is that at the half way point the image has to be flipped so that when the scarf is worn both sides have the motif going in the same direction and that they match perfectly. I ended up weaving five butterfly motifs going in one direction and four going the other. I finished my scarf with hemstitching in small increments and then did a plaited fringe treatment. I think it really adds that special touch to the scarf.
  For the second scarf on the warp I decided to change things up a bit and I used 2/8 Tencel in an almost matching Red Violet for the weft. Bamboo is lovely and smooth but it is slightly matte and I thought that the having the same colour but with added shine would be interesting. I wove the scarf with the same motif placement, but the Tencel makes the huck floats shimmer and catch the light. I finished this scarf with the same plaited fringe treatment.
 The Tencel and bamboo scarf is slightly darker then the all bamboo scarf. They both have a lovely drape. It was my first time working with bamboo and it was a joy!
  I love this pictorial type of weaving and I’ll be working on a few original ideas for my next designs.

