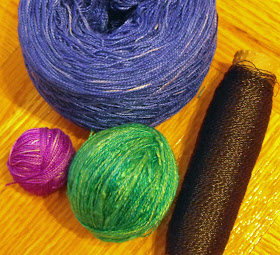
Now that I’m in my second year of weaving, I’m finally tackling my first piece of plain weave…..well sort of plain weave. I am doing a spaced and crammed scarf with an added inlay technique called Theo Moorman. Theo Moorman technique is based on groups of three warp ends. One thread is very fine and is used to anchor the supplemental inlay weft thread. The other two threads are thicker and are the primary structure threads; they are woven as plain weave. In each dent there are three threads, one thin thread and two thicker threads.

In my case I am using 2/20 silk that has been hand dyed a variegated royal blue for the structure threads. For the fine thread I was going to use sewing thread in a slightly darker blue, but lucky for me it ran out, before my warp was finished. So instead I am using a stainless steel thread encased in black merino wool, it is very shiny and makes me very happy! Thanks to
Susan at Thrums for sharing a sample of this yarn with us. I think that the scarf is going to be much better; it really adds a depth to the scarf.

For the spaced and crammed part of the scarf, there are five warp blocks 1” across and ½” space between them. So I put 3 threads per dent in a 12 dent reed that equals 1” and left 6 dents empty.

The main weft I am used is the same blue silk as the warp and for the Theo Moorman inlay squares I am using 2 ply green silk with soft slubs and purple 2/20 silk. 1” squares are woven then a 1” space is left, I’m using Venetian blind slats for the spaces. To add even more interest to the scarf, I’m only adding inlay on specific blocks to make a larger design.

Theo Moorman inlay is a very simple technique yet it has such a great impact. First step is to do one pick in plain weave with the main weft, in my case the blue silk. It goes all the way across and where there is no inlay, it weaves a block made up of plain weave.

Second step is to open a shed that only has the stainless steel and throw a pick of the supplemental weft, green silk.

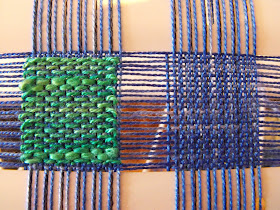
Here is a close up of one of the inlay squares. The blue weft can barely be seen, further away it can’t be seen at all. The inlay is done in a brick method; it can also be done as perfectly straight rows, called the Dukagang method. Beside is a block of just plain weave however with variegation of warp and weft with the shine of the stainless steel it is also very special.

A cool thing about Theo Moorman technique is that the back of the cloth doesn’t show any of the inlay weft. It is truly a surface design.

Here is the sample so far, exciting isn’t it, and yet another addition to Mum's workshop!

 In my case I am using 2/20 silk that has been hand dyed a variegated royal blue for the structure threads. For the fine thread I was going to use sewing thread in a slightly darker blue, but lucky for me it ran out, before my warp was finished. So instead I am using a stainless steel thread encased in black merino wool, it is very shiny and makes me very happy! Thanks to Susan at Thrums for sharing a sample of this yarn with us. I think that the scarf is going to be much better; it really adds a depth to the scarf.
 For the spaced and crammed part of the scarf, there are five warp blocks 1” across and ½” space between them. So I put 3 threads per dent in a 12 dent reed that equals 1” and left 6 dents empty.
 The main weft I am used is the same blue silk as the warp and for the Theo Moorman inlay squares I am using 2 ply green silk with soft slubs and purple 2/20 silk. 1” squares are woven then a 1” space is left, I’m using Venetian blind slats for the spaces. To add even more interest to the scarf, I’m only adding inlay on specific blocks to make a larger design.
 Theo Moorman inlay is a very simple technique yet it has such a great impact. First step is to do one pick in plain weave with the main weft, in my case the blue silk. It goes all the way across and where there is no inlay, it weaves a block made up of plain weave.
 Second step is to open a shed that only has the stainless steel and throw a pick of the supplemental weft, green silk.
  Here is a close up of one of the inlay squares. The blue weft can barely be seen, further away it can’t be seen at all. The inlay is done in a brick method; it can also be done as perfectly straight rows, called the Dukagang method. Beside is a block of just plain weave however with variegation of warp and weft with the shine of the stainless steel it is also very special.
  A cool thing about Theo Moorman technique is that the back of the cloth doesn’t show any of the inlay weft. It is truly a surface design.
  Here is the sample so far, exciting isn’t it, and yet another addition to Mum's workshop!
Thanks for the great pics and explanation of Theo Moorman technique!! I have a chance to take a workshop in it over the summer and this helps me decide.
ReplyDeleteI've actually seen people work with this technique, but I didn't understand it til now.
Your mom's workshop sounds great. I really do want to entice her to come teach in New England one of these years!!
Sue
What a great post ! A really helpful tutorial on this technique. The colours are lovely and hopefully we can see it when it is all finished and ready to wear !
ReplyDeleteI hope I live long enough to try all the possiblilities there are with weaving! Thanks for the great info.
ReplyDeleteGreat post Ngaire!
ReplyDeleteIt will be interesting to see if the steel lends a 3D quality to the cloth when it comes off the loom.
I much prefer Theo Mormon to tapestry actually. Much more freedon to design on the (regular) loom.
Susan
Ngaire, great post and lovely weaving! Thanks for sharing.
ReplyDeleteLooking forward to the finished product :-)
Margreet
That looks fantastic, gets me thinking if I can accomplish something similar on my RH loom.
ReplyDeleteThank you so much for sharing these great and informative pictures. I look very much forward to see the finished textile!
ReplyDeleteIt looks so very interesting!
ReplyDeleteI really appreciate your explaination of this. I had heard of this technique, but not seen it explained. Now it makes a bit more sense.
ReplyDeleteWhat a great explanation of Theo Moorman - I actually understood it!
ReplyDeleteOh, and lovely colours too!
Your explanation of Theo Moorman was so good that I actually understood it fully! Oh, and your colours are great too....
ReplyDeleteThanks, Ngaire, for your clear explanation and photos, set to entice. I'm going to try it, thanks to you!
ReplyDeleteThe explanation is great. I could see and actually understand in my mind what it is you are doing. I love that it is only visible on one side! I always wanted to know how it was done.
ReplyDelete