To try and keep from purchasing yet another blue yarn and to try and utilize my stash I started carrying around my old Day Timer with bits of my stash sewn onto pages. A pretty good idea I thought. It was organized by fibre but not by size or colour; I had noted if I had a full tube or not, but nothing else. Good but no cigar!
 I’m not the kind of gal who can just dump a bunch of yarn in the middle of the floor and fish out the perfect varied yarns and colours and come up with an amazing scarf. I’ve known ladies like that and am totally impressed. I, however, fall into the more systematic, pattern oriented type of weaver, so I need to know what I have on hand to keep myself centered.
My project was to get my Fibre Binder organized to take to the ANWG conference in May. I want to make informed, intelligent yarn purchases and maximize my dollars spent – I know, it’s a dream, a wonderful, wonderful dream!
I took 8x11 card stock and cut it into 3 varying widths. They stack on top of each other.
 Then the holes were punched, I managed to get 21 holes per page. I made one set of cards for each of my fibres.
 Here is my 2/8 unmercerized cotton in the cards with notations of the manufacturer and the amount in ounces, I’m so impressed!
 I have also made a list of my magazines because I’m always looking for old Handwoven and Weaver magazines and have more than once purchased duplicates……I’ve gotta stop that!
 On a roll now, so I’ve got a list of my books just in case too!
 Here’s my finished binder, and yes I had to make dividers too – I’m an organizing fool!
 Yesterday, we went to the Ponderosa Weavers Guild meeting in Kelowna and brought this sad old gal home.
She has been kicking around our guild room as a loaner for some time and with space being a bit tight, she needed a new home. She’s getting it…she is off to John Low at Woolhouse Tools in Armstrong BC (maker of the wonderful Gertrude Loom, both Susan of Thrums fame and Madelyn Van Der Hooght editor of Handwoven are proud owners) where she will be given a face lift. Then she’s off to Ethiopia! Amazing that this Ashford Wheel made in New Zealand, living in British Columbia, Canada will find a new owner in Africa. Can you imagine what a difference it will make to someones' life to own this wheel! I feel very lucky to have been a link in the chain.
Weaving Words
The word cotton comes from the Arabic word qutun or kutun, a term used to describe any fine textile.
 I’d like to share my method of using a temple with you just as my friend Susan shared her tips with me to get me going! First you have to figure out what size to make the temple, so that it does its’ job of maintaining the warp width as sleyed in the reed and prevents narrowing of the woven cloth as you weave the web. I don’t use temples when weaving tea towels or quick wool scarves, but I do use them for rugs and table linens, where straight edges are essential.
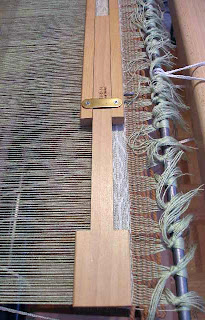 I make sure I have about 2” of weaving done before I place the temple on the web. Sit it back about ¼” from the fell and plan to move it forward about every ¾” to 1”. I know this really messes up your rhythm, but if you are striving for straight edges, it’s worth it.
  When I move the temple, I move the slider brace back to allow the temple to tent up in the middle and place the tenterhooks in the selvedge about 1/16”from the edge. I really take my time to ensure that the hooks are positioned straight on the web and that they are all imbedded in the selvedge threads. You can imagine what would happen if you continuously placed the temple at an angle, after a couple of feet you would have significant draw in.
 You should be able to gently push the temple down with one finger, if it takes any more pressure than that, you either have not been allowing enough slack on your weft throws or your temple is too long for the web. You’ve got to fix one or the other!
 Lots of weavers complain that the holes made in the selvedges are permanent in the weaving. This should not be an issue; the temple should only be in one place for moments and check that the pins are in the right place and not piercing through or shredding any weft threads.
  This is my selvedge after moving the temple, a few slight holes and some upward curving is normal.
  The holes can be finger rubbed right out and totally disappear after wet finishing.
 I have a couple of other tips for you; never leave the temple in place when you leave the loom as it will stretch your web and never leave the temple in place when you advance the warp as it can cause damage on a slack web. I find the benefits far outweigh the inconvience of a temple.
 The Kumihimo package came with five strands of synthetic yarn to start you off, and this is the first braid I did. I must admit that I really enjoyed it.
 I enjoyed it so much that I pulled 60” of gold ribbon, purple orlec and navy orlec to braid. The ribbon I used singly but the orlec was tripled to match the ribbons thickness. The pattern was extremely simple and easily memorized, so I just kept going.
 This is a close up of the braid.


 Even though I made sure to alternate the tabby picks, there was definite deflections on some of the pattern picks. I started out by weaving 2” with sewing thread as the weft to make sure my hem will be flat, so I was off to a good start. I unwove and rewove this piece several times… I tried pattern – tabby – pattern …repeat, then tabby – pattern – pattern – tabby …repeat. Nothing seemed to get rid of the scrunching, I didn’t like it.
 This is how it wove up – I’m thrilled. I know that if you weave Overshot with out half tones it is called Monk’s Belt; not sure if there is another name for No Tabby Overshot, but I can see scads of possibilities for it! Again the colour is wrong, this is a lovely soft celery green in real life.
 I found some 2/10 mercerized cotton for the weft that was just one tone and slightly bluer than my warp, so the effect is really lovely. This is weaving up very nicely and the floats give me great texture on the right side, the underside has no raised floats so the runner should lay flat. I’m a happy weaver today!
 I took my remaining warp yarn with me, so I could colour coordinate….I was only going for one wee item!
 Look at my Big Bag of Happy!
  I was so taken with these lovely spring colours that I just kept on putting them on the table. The tall orange tube is 2 ply linen made in Scotland and the fat coral tube is 2/10 mercerized cotton. All the rest are 2/8 or 2/4 cotton. Don’t they just make you think spring!
  Never one to leave with only what I need……I found these two beginners Hamanaka Kumihimo packages. I had purchased a Kumihimo book some time ago, but was thinking hard about investing in the stand and weighted tamas and these seemed to be a great way to see if I like to braid for $15.99 each.
 The round disk is for round braids and is made from thick dense sponge like material; thankfully there are photos of each style of round braid and pictograph instructions. You just choose your colours and move the yarn in the order given and you’re off to the races.
  The square plate is for flat braids, seems that everything else is the same. Now which one to try first?
 On a completely different track, my tomato plants are doing exceptionally well and are into the 8th leaf set now. The grow lights have kept them from being too leggy, so that’s a bonus. I had to be quite horrid last week and felt so bad thinning each pot to only 1 plant, but sometimes you have to be cruel to be kind….
  I went to the Shuswap Seedy Saturday last week; it’s an offshoot of Seeds of Diversity, which encourage saving heritage seeds- these seeds are open pollinators, so their offspring will be genetically the same as the parent plants. The seeds exchanged are never genetically modified, or terminator seeds – these are seeds that have been modified to produce sterile seeds to benefit the agrochemical industry. When you went through the door there was a huge table of seeds in bottles and envelopes, you just helped yourself to them and left any seeds that you had saved. It was wonderful and I was able to add 2 tomato varieties to my collection.
 To this: The first step I took to make this dull natural linen piece stand apart was to soak it in a Procion MX dye bath for 30 minutes. I chose to make it a jade green and I was amazed at how well the linen took the colour. I was expecting to have the beige undertone dull down my colour, but that didn’t happen, the colour was clear and bright after drying.
 Since this was my first attempt with fabric painting I decided to hedge my bets and use a commercial stencil. This one is of an Engleman Ivy plant. I used a foam brush and dabbed on watered down violet, then 4 shades of green that I made using the Dye-na-flow fabric paints. After 24 hours of drying time and hot ironing on the wrong side, the stencil is set and feels very soft.
 I’m thinking of calling this small piece a flower rug, it highlights the bud vase nicely I think.
 For my second piece I decided to be brave with the base colour and chose magenta, again the colour came up wonderfully. Procion MX is a wonder…..
 Trying for a bit more originality I unearthed this hottie from my cupboard for inspiration and decided to try a poppy flower.
 I sketched the components of the poppy onto a piece of paper; using a sharpie I transferred the design onto clear Mylar stencil medium. I had fears of drawing freehand onto the linen, so this was my compromise. I cut out the general shapes to ensure that my scale remained constant. I could just see myself making one leaf huge and the other tiny, or not having enough room for the flower or something like that!
  After cutting the pieces out I painted in the general shapes with undiluted fabric paint, using several reds and greens to try and get a more life like effect.
 After leaving the basic shapes to dry, with black and a fine brush I added bit more definition. Not as happy with this one, but my daughter says I’m very critical of my own work so I just have to find the right flower arrangement to highlight it. Susan, note the vase….and thank you for it!
  In my ongoing attempts to finish up my projects I have finally washed my overshot with borders pieces and here they hang drying. I’m rather impressed with this mirror shot! Moving forward here…