Pages

Monday, December 19, 2016

8 Shaft Broken Twill Tea Towels

A couple of times a year I like to put on what I like to call a ‘comfort warp’.  This is a warp that I know will pose no surprises and will be a relaxing weave and a chance to work on my loom posture and to ensure I’m using a good throwing technique.  If my mind isn’t on the pattern I can really concentrate on sitting up straight, throwing the shuttle correctly and depressing the treadles fully.

Twill is my comfort pattern weave and an 8 Shaft Broken Twill pattern fits the bill of comfort perfectly.  Striped warp tea towels are always a good project for me, it uses up small amounts of coloured cotton and because I usually choose to do only 6 towels at a time, its a quick project and perfect for the Etsy Shop.
These are the results of pulling 10 white 2/8 cotton ends then 4 ends of either pink, red violet, turquoise or peach sequentially.  They are a lovely fresh looking towel.
I like to add more interest to the towels by weaving a weft striped border starting at about 4.5 inches from the beginning of the towel.  This allows me to have 1.5 inches for a turned under hem and then a couple of inches before the stripes begin.  With these towels I chose to weave the weft stripes in turquoise and then using the same sequence in red violet on the following tea towel.  I thought that the pink and peach were too pale to show up well.
The goal was to have 3 pairs of tea towels that matched, each one containing 1 turquoise striped towel and its red violet partner.

I mentioned at the beginning that tea towels hold no surprises for me, but this time I got a pretty good one on my last towel.  I ran out of warp!  I have pre-measured strings that I use for my projects and this time I grabbed the wrong one......so the Sesame Street song ‘ One of these things is not like the others’, really rings true.

Wednesday, December 7, 2016

Getting Cracking with Crackle Weave

This year the Exploring More Study Group within the Qualicum Weavers Guild is taking a look at Crackle Weave.  As a group we thought that it had lots of potential for all of us; with one caveat, we decided to look at ‘Unconventional Crackle’.  
  
Our first task was to understand traditional Crackle Weave, so that we had a good jumping off point.  There are a few ground rules for Crackle weave ~  no more than a 3 thread float, the plain sequence must always be maintained, when changing blocks an incidental must be inserted, never more than 4 threads before the twill changes direction.
This is an 8 shaft Crackle threading that I developed; the tie up is the one suggested for 8 shafts in May E Snyder’s book “The Crackle Weave”  and the treadling is plain twill. It is treadled with tabby threads as this is the traditional style.  The green lines show the placement of the ‘incidentals’ which connect one unit to the next.
This is the same draft with the tabby removed from the treadling, you can see the pattern much more clearly now that it is no longer a traditional treadling. 
This is the same threading and tie up; I have changed the treadling to a M&W style of treadling.  Now it’s starting to looking more exciting.
This is the same draft but it is ‘woven as drawn in’, or the treadling is the same as the threading.  Finally it really shows how lovely Crackle Weave can be.  If I was going to weave it I'd remove the twill borders  as I think they detract from the pattern.

The next step is to weave a project and I have decided to weave tea towels using stripes of colour to delineate the blocks.  I am all about using up small cones left in the stash cupboard!  The colours are plum, lime, turquoise, bright green and cerulean green.  I will use navy for the weft.
Now let the weaving begin!

Friday, December 2, 2016

Dye Day from June ~ The Forgotten Post

I have totally not kept up with the blog and with this post I actually forgot to publish it ~ oops!  We have a yearly dye day where we dye silk scarf warps and this year we pulled some warps using Tencel too.
We each pulled three white silk warps with 200 threads in each .  Then we used yellow Tencel to make three more warps.  We used yellow Tencel because for some reason we had bought two large cones of yellow a couple of years ago and it and the Coral we duplicated are not colours we use often, why did we buy them?!

For the Tencel we pulled three different styles of warps.  The first style is 200 threads divided into five groups of 40 threads, then two of the bunches are flipped so that the crosses are at the other end for painting. The second style is 96 threads divided into two groups of 48 threads.  The third style is just 96 threads, not sure if we want it for a scarf or a shawl at this point.
It is always surprising how hydroscopic the silk is, it takes forever for it to get completely wet!  In the picture you can see that we use weft twinning to keep the warp tidy and flat enough to paint.  The flashes of green are painter’s masking tape that we use to label the warps, about half of them fell off though!
We use Procion MX dyes and the technique can be found here.  We like to use sponge brushes to add the dyes.  We used the same technique for the Tencel warps.
Here is a picture of the warps batching.  We wrap the scarves in plastic wrap and then place them in plastic bags with like colours just in case there is any leakage.  We also did some silk scarf blanks.  It was a very long day of dyeing.
The next day we rinsed everything.  It always looks a little messy!
Here is a scarf freshly rinsed scrunched into a ball.  But just a couple of tugs and it is all straight again, like magic.
The scarves are all hung out to dry out of the sun.  Don’t they look exciting!
And here they are all finished.  We were both amazed at how well the yellow Tencel took the dye.  I’m going to describe the colours of each warp and who it belongs to because we will inevitably lose the tag and won’t remember who’s is who’s!
Here are Mum’s three silk warps.  The top is Gold, Plum, Moss and Rust/Brown.  The middle is Deep Navy Blue, Black and Silver.  And the bottom one is Purple, Turquoise, Green and Navy Blue.
Here is Mum’s two Tencel warps.  The top is Orange, Red, Brown, Rust and the original Yellow. There are some streaks of green from the brown dye breaking.  This warp is 200 threads and has been flip flopped.  The bottom warp is both 96 thread Tencel warps, it was getting late in the evening so we combined them.  The colours are Navy, Ink Blue, Bright Green, Orange, Red and original Yellow. There are lots of secondary colours like Brown, Purple and Greens.
Here are my three silk warps.  The top is Ink Blue and Leaf Green.  The middle is Gold, Rust and Bronze Brown.  And the bottom one is Plum and Moss.
Here are my two Tencel warps.  The top is Orange, Brown, Gold (Sunflower Yellow) and original Yellow.  There are some streaks of green from the brown dye breaking.  This warp is 200 threads and has been flip flopped.  The bottom warp is both 96 thread warps.  The colours are Purple, Teal, Green and the original Yellow.  There are secondary colours of blues and greens.
Final Garden Shot is the Black Mission Fig.  It was such a cold summer that the figs are really late. We only got two weeks of above 25C at the end of August then it was back to the cool weather, it was a truly sucky short summer.

Wednesday, November 23, 2016

The Tale of Two Scarves

I was doing a photo shoot for some new scarves in the Etsy shop when I noticed something about two of the scarves.  The scarves are Mum’s Drall scarf and my polka dot scarf.
The scarves are both made from a hand dyed silk warp.  They are the same silk and both warps started at the same length of 100 inches. But in the below picture you can see that they are different lengths.  The purple drall is 67 inches, and the blue polka dots is 71 ¾ inches.  Sorry about the quality of the pictures they were taken at the end of the day and are a little dark.
The main reason for the difference in length was that the drall scarf has a large pattern repeat so Mum had to finish at a certain spot so that the ends of the scarf matched.

The scarves are also two different widths.  They are the same silk and both warps are 200 threads, well they should be but Mum wound a couple of extra threads to make 208!  The purple drall has a finished width of 7 inches and the blue polka dots is 5 ¼ inches wide.
They are both set to 28 epi so the addition of 8 threads would only be about a ¼ of an inch.  But Mum used a 14 dent reed and sleyed two per dent.  I used a 12 dent reed and sleyed 2 2 3.  So there would be a slight difference but I think that the biggest factor in the different widths is that we used two different wefts.  Mum used a 2/8 Tencel and I used a 2/20 bamboo.

Now that I think about it the difference in the grist of the weft would also impact the length because of how much warp would be taken up with going around the weft.

We also managed to have different length of fringe!  Purple drall has a 6 inch fringe and the blue polka dots has a 8 inch fringe.
It is amazing the difference the weft choice has made in these two scarves!  Also the weave structure would have made a difference on the scarves.  The purple drall scarf is 3/1 twill structure.  The polka dot scarf is a network twill.  Just goes to show that every little choice makes a difference.

Final Garden Shot is the jumble of dahlias that are in the front garden.  They are a cheerful and colourful addition!

Saturday, November 19, 2016

Mohair Shawl or Throw Part 2

Since mohair is really fuzzy there is no reason to do a pattern as it just won’t be seen, so plain weave it is!   I threaded the loom in a straight twill to help separate the threads ~ 1,2,3,4 repeat.

Again, since mohair is really fuzzy and prone to bridging use the lowest dent reed you have, in my case I had a 6 dent reed, so I was able to sley 1 per dent.
Single shaft lifted.

The real gem of information that I found on line was that the tie up should be done in the skeleton manner ~ one shaft to one treadle ~ so shaft 1 to treadle 1, shaft 2 to treadle 2, shaft 3 to treadle 3 and shaft 4 to treadle 4.  Then when you start weaving you press treadle 1, then treadle 3 to make your first tabby pick, then repeat the process for treadle 2 and 4 for the second tabby.  By lifting each shaft individually the bridging and tangling is minimized.  This system works great for a Jack loom but not for a Countermarche like my Louet Spring.
Both shafts lifted.

For a countermarche loom the for the system to work is that you tie up treadle 1 to lift shaft 1, treadle 2 to lift shafts 1 and 3, treadle 3 to lift shaft 2, treadle 4 to lift shafts 2 and 4. When you change shafts you lift shaft 1 first then shaft 2, then you throw the pick, this works like a charm!

The really horrifying thing about weaving with mohair as both warp and weft is that it sticks and bridges and clings together like mad.  You really don’t want to be un-weaving and if you do need to, you are forced to pull out clumps of mohair by hand just to change sheds.
After the shawl was off the loom I dithered around for yonks deciding on what to do with the fringe, I decided to stabilize the end by weft twining and doing a twisted fringe without the knots.  I then hand washed the piece because I have a front load washer and can’t really stop the process once it has started.

After washing to get some fulling, and drying the shawl (which was a feat considering we have had the wettest November on record!); I needed to brush up the nap to get the full effect of the mohair.
I bought a self cleaning cat comb to do the brushing and that is when I found out that my fulling wasn’t great.  Every pass of the comb made the weft move!  What a nightmare, it just hadn't fulled enough!  By this time I was totally 'un in love' with this piece.
This is the fibre left in the comb after one pass.
The end result is a mohair shawl that isn’t quite what I’d hoped.  It looks nicely fulled but lacks real fibre fusion, it has very little nap raised, but it looks pretty good in my studio on the red couch, so I’m keeping it.

Sunday, October 23, 2016

Mohair Shawl or Throw Part 1


We came back from Croatia last week and I’m finally back in the groove.  It seems that every year older I get  a day is added to my recovery time!  We traveled to Croatia with a US based tour group called Road Scholar and I cannot say enough good things about them. We also traveled to Bosnia-Herzegovina and Montenegro, so I really feel we got a good view of the Balkans!  My general take on this area is ‘beautiful but troubled’.
When I left in September I was just putting a mohair warp on my loom, I had just picked up some lovely colours at a retiring weaver’s sale.
Don’t the yarns look lovely all wound onto the shuttles? This is my very first mohair warp and I would suggest that if it is your first time using this fibre that you ask lots and lots of questions as it can be quite a difficult fibre to use.
The first great piece of information that I got was to use a dummy warp if you are going to do multiple projects due to the cost of the mohair ~ it is a little spendy to waste.  Since multiple projects is my plan this meant pulling a 2/8 cotton warp of 180 ends, 1 yard long.  I pulled the dummy warp onto the loom, threaded it and sleyed it at 8 ends per inch. It is a bit hard to see the dummy warp but, it’s there!
I knew I wanted to do a plaid shawl/throw, so I pulled the mohair warp ends in very small bouts of 20 threads.  This really helped when I was tied onto the dummy warp.  Trying to handle huge groups of such sticky yarn would have been a nightmare.  I held the cross together with two pens that I bound together with elastic bands; these were small enough and light enough to hold in one had while tying on.
Here it is all tied on and pooling on the floor, next job is to pull it through the reed and heddles
Tying each knot on individually is time consuming, but oh so pretty when it’s done.

I did as much on line and in person research as I could and found that the general range for sett is 6 to 8 ends per inch.  I chose to sett at 8 ends per inch because 6 ends per inch was just too loose.  As soon a I had the mohair beamed I knew it was too close a sett, so I un-sleyed the reed and re-sleyed at 6 ends per inch.  Almost ready to weave!
I lashed onto the front beam, again to save the  warp length and to reduce loom waste.

We got back from holiday to find that out 4 year old Samsung dishwasher refused to start!  The new Bosch 800Plus is slipping into place right now.  We had bought all Samsung appliances when we bought this new house just 4 years ago and this is the third Samsung appliance we have replaced.  Really, really don’t recommend that brand.

Saturday, September 3, 2016

Theo Moorman Twill Again ~ Four Shaft Scarf

The final project in my Theo Moorman journey was a real pleasure to weave, but yet again Windows 10 has eaten my data!  Yesterday’s forced update ate a bunch of my PCW files.......what the heck, they had nothing to do with Windows!   

This is what I can remember....
I decided to work with the same format as my previous Theo Moorman scarf, but to make a few small tweaks.  I changed the colour, the twill pattern edge and both the inlay fibre and how it was laid in.
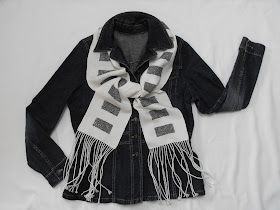
I chose to weave the background cloth for this scarf using white 2/8 tencel.  I kept the silver lurex as the tie down thread and changed the inlay yarn to Filatura Di Crossa Gioiello in a slate grey colour.  This is a fine knitting yarn that is mohair, wool and a tiny silver sparkle bumps.
The warp was threaded with a simple broken twill pattern on the edges and 2/2 twill for the inlay portion.  The goal was to have plenty of interest on the reverse side of the scarf. The sparkle panel down the centre and the broken twill edges should take care of that.
I laid in the Theo Moorman design as large blocks down the centre of the scarf and I think it’s a winner.  I love the graphic look and because the inlay yarn is so fine and soft I’ve kept a beautiful drape.
Well off to see what I can salvage on this laptop....I swear to god Microsoft is doing this crap to make us all Apple users!

Friday, August 19, 2016

Theo Moorman Twill on Four Shafts ~ A Scarf

I have had quite a summer... full of computer angst and weaving!  My laptop which was running Windows 7 crashed and I bought a new laptop with Windows 10.  Recovering my photos and information has been an ongoing frustration.  I’m not a complete Luddite, but man, Windows 10 is very unfriendly towards older files and programs and tries to force you to keep your information on their cloud which they meter.  Hopefully, I’m back on track now, so back to weaving!

After completing my first Theo Moorman technique scarf on three shafts for the Qualicum Weavers study group (seen here) I immediately put on another scarf warp.  I was really happy with the first scarf, but the reverse side of the scarf was really plain Jane and boring.

The goal I set myself was to see if I could use the Theo Moorman technique to make a scarf that had nice drape and that also included some interest on the back side.  Usually all the fun stuff sits on the front and the back of the cloth is covered up if it’s a garment or by being placed up against a wall if it’s a hanging.

I threaded the loom using a 4 shaft 2/2 twill as the background cloth rather than the traditional plain weave.   My base warp is 2/8 tencel and the Theo Moorman tie down treads are silver lurex.

My weft is the same 2/8 tencel and the inlay section in the middle is hand spun, hand dyed silk singles. The soft spin of the silk really encourages the drape.

I was thrilled with the way the silver sparkled on the reverse side of the scarf and with the contrasting stripe of colour near the selvedge and the twill pattern, I’m calling this a winner!


I was so happy with this scarf that I contacted Handwoven Magazine and happily they asked me to send it to them.  Then the Canadian Postal strike in June made it impossible for me to make the submission deadline.  Then I had a horrible time trying to find a commercially made yarn that is the same as my hand spun....it just all became such a daunting task, I’m giving up and sharing with you instead.

This year my hardy hibiscus are all doing fantastically...Hibiscus Syriacus ‘Aphrodite’, look closely and you can see a bee inside.