Monday, June 30, 2014

Clearing the Handspun Decks

Weaving hasn’t been consuming all of my time lately ~ I’ve reconnected with my Lendrum Spinning wheel and I’m truly enjoying it!

Before I could spin the Louet silk that I dyed a few weeks ago, I had to empty up some bobbins that had been languishing for yonks.
I believe that this single on the bobbin is spun from a colourway called Teddy Bear and frankly I can’t remember if Susan gave it to me or if I bought it at a spinning day….either way it was just taking up a bobbin and looking very stripey.Teddybear merino wool is spot dyed brown and pink with cream and a bit of yellow and when I spun it I got a nice long marl moving from cream to brown to pink in every possible permutation.

I didn’t want to lose that beautiful transition and if I plied it with itself I would tone the whole thing down and blah it out I think.
I chose to ply it with this super fine cashmina which is a wool and cashmere blend.
Because the cashmina is very, very fine compared to the handspun merino wool, I got a really great spiral yarn.
I’m really happy with the result!
After freeing up my spinning wheel; I now have all of the silk spun and plied with itself.
The effect is an all over pale pink.
But when you look closely you can see a bit of orange and cream.  I think I’ll use it as weft for a scarf.
After all that spinning I was really stoked about weaving with silk and so a few days ago I warped up this hand painted silk.  The silk was painted with ProcionMX in Old Gold and Yellow so it is very sunshiny and I'm ready to weave!

Tuesday, June 17, 2014

Tartan Yardage Completed ~ Lynch Tartan

My tartan yardage has been off the loom for awhile now and I just remembered that I haven’t shown you the finished product.
It made a lovely looking log of tartan as I pulled it off the loom.
I ran out of the Ancient Blue wool weft when I was well into the 8 yards; I substituted grey/olive marled wool in the same grist for the weft that I luckily had on hand.  You can definitely see the difference between the two wefts; the true tartan wool is much smoother and has more lustre than the run of the mill wool weft.  However, the grey/olive weft shows the green up much more than the Ancient Blue.  This photo is before washing to full the cloth.

The definition of Ancient colours is that they are distinct from modern colours by being less saturated in tone and lighter in shade.  The term ‘modern’ refers to the aniline dyes introduced around 1860 which produce darker greens and blues and richer reds and yellows.  The term ‘ancient’ should no be confused with the age of the design.

I thought I’d give you some weaving statistics for this yardage.  I sett the warp at 28 ends per inch, 2 per dent in a 14 dent reed.

The On loom Width was 32 inches ~ The On loom length was 8 yards.

The Off loom width was 30 inches for the Lynch Tartan ~ The Off loom lengths was 5 yards 29 inches.

The Off loom width was 30 inches for the Plaid piece ~ The Off loom length was 1 yard 12 inches.
The Loom waste in the warp was 15 inches at the end and 4 inches at the tie on for a total of 19 inches.

I washed the yardage in my front loader machine on a cycle that took 25 minutes.  I want the yardage to be well fulled and this was the least time my machine could do, and frankly I just wasn't prepared to do it by hand.  I used the tiniest amount of organic laundry soap in the wash. Ahhh, I’m wishing for the days when I could open the top of the machine and pull my weaving out when I thought it looked right, sadly those days are long gone and I have to wait for the full cycle!
I folded the yardage a few times so that it fit on the drying rack and put it outside in the shade to dry.

The finished width was 29 inches for the Lynch Tartan ~ The finished length was 5 yards 24 inches long.

The finished width 27-2/4 inches for the Plaid piece ~ The finished length was 1 yard 10 inches long.

The secondary weft caused more shrinkage than the Lochcarron Wool weft; but overall there was very little shrinkage ~ not even 1%!
This is the tartan before it was pressed.
 You can see a huge difference in the fabric after just one pass through the steam press.  This yardage is amazingly supple and light and has a fabulous sheen, really lovely.
My plan for much of this yardage is to frame a piece for each of the members of the family and maybe get a garment for myself.

The Europeans have a phrase for one slow truck trying to pass another slow truck on the highway ~ an elephant race ~ well, this yardage and Ngaires shawls were our elephant race!  Thankfully, both are off the looms and we are ready to weave again!


Wednesday, June 4, 2014

Dyeing Louet Fibre with Gaywool Dye ~ Part 2

Finally the continuation of Dyeing Louet Silk Top with Gaywool dye story.  I was trying to get enough silk spun for the final photo and the sunny days kept pulling me outside, hence the lengthy delay!
After waiting for 24 hours to allow the dyes to penetrate the silk I unwrapped the plastic wrap to finally get to see the result of my dye sprinkling. I removed it from the plastic wrap and coiled into a bowl for rinsing.
The first rinse had a bit of extra dye, but surprisingly not that much.  Most of the very liberally sprinkled dye has done it’s job and coloured the silk beautifully.
I must admit that I loved the colour of the water as I poured it off!
After I rinsed the silk out completely I laid it on a towel covered drying rack in the shade to dry which took about 6 hours in our marine climate.
I’m really impressed with the colours now that it’s dry enough to spin.
I had planned to have some undyed sections of silk, but I see that I should have opened up the silk roving just a bit more when I was applying the dye.  The dye took beautifully on one side but didn't seep all the way to the center of the roving.
Finally I’m ready to spin, and don't you just love my nifty plastic bag apron?  I find that silk fibres stick to my regular cotton spinning apron so a clear plastic bag does the trick!
I pull off a section of roving about 18 inches long and gently tug the sections between my fingers all along the length. This opens up the fibre enough to make the silk fibres moved easily as I spin.
I’m really pleased with the colours as I’m filling the bobbin ~ a lovely marled pastel pink and coral is what I’m seeing right now, but I’m sure the effect will change when I ply it.  I’m aiming for a 20/2 grist for weaving, so this is quite a fine yarn.

Monday, May 26, 2014

There and Back Again ~ Warping Mill Prototype

When we were in New Zealand in March we stopped in for a studio visit with Diane Dudfield ~ she writes Diane’s Loom Talk blog which is well worth a visit!
This is Diane (on the left) and me, in her amazing studio right on the peninsula in Katikati NZ! We had a great visit with lots of loom talk and show and tell.
Michael spotted Diane’s warping mill tucked in beside her loom and she graciously took the time to set it up for us to see. My husband was in the process of designing a warping mill built for my specific needs and he was able to get a few ideas from watching Diane set up her warping mill.
Diane gave me this great cheese of 110/2 Merino yarn to try and a wonderful copy of her artists statement.  I feel a collapse weave scarf or a woven shibori in my future!
Here is the prototype, which is made in softwood, for the warping mill that Michael is designing for me. It is done and ready for its maiden trial and  I will finally get to try it out as soon as I finish the Lynch Tartan which is keeping me occupied for now!
Michael has made it very lightweight while still maintaining structural integrity and has figured out a way for me to take it apart and fold it flat for storage. He has had his work cut out for him because I’m small and not all that strong, so I needed to be able to lift it onto the dining room table and then take it apart without help.  Once I make a few warps and we knock out all the bugs, Michael will make it in maple hardwood with stainless steel rods and fitting…..gonna be a beauty!
Today I finally ran out of the Ancient Blue yarn that I used to weave the family tartan ~ talk about poor planning on my part!  I had some really lovely steel gray/olive green marl coloured wool of the same grist so I’ll carry on and weave the rest of the warp off using it.  It will no longer be the Lynch family registered tartan, now it is just a humble plaid!

Wednesday, May 21, 2014

Dyeing Louet Fibre with Gaywool Dye

Don’t you just love it when a ‘box of happy’ is delivered to your door?  I got mine a few days ago from Louet!

I received a half pound of Merino Silk 80/20 Top fibre in Natural and the same again in  Black; you can clearly see the silk running through the black Merino so you know it is soft, soft, soft!  I also received a half pound of 
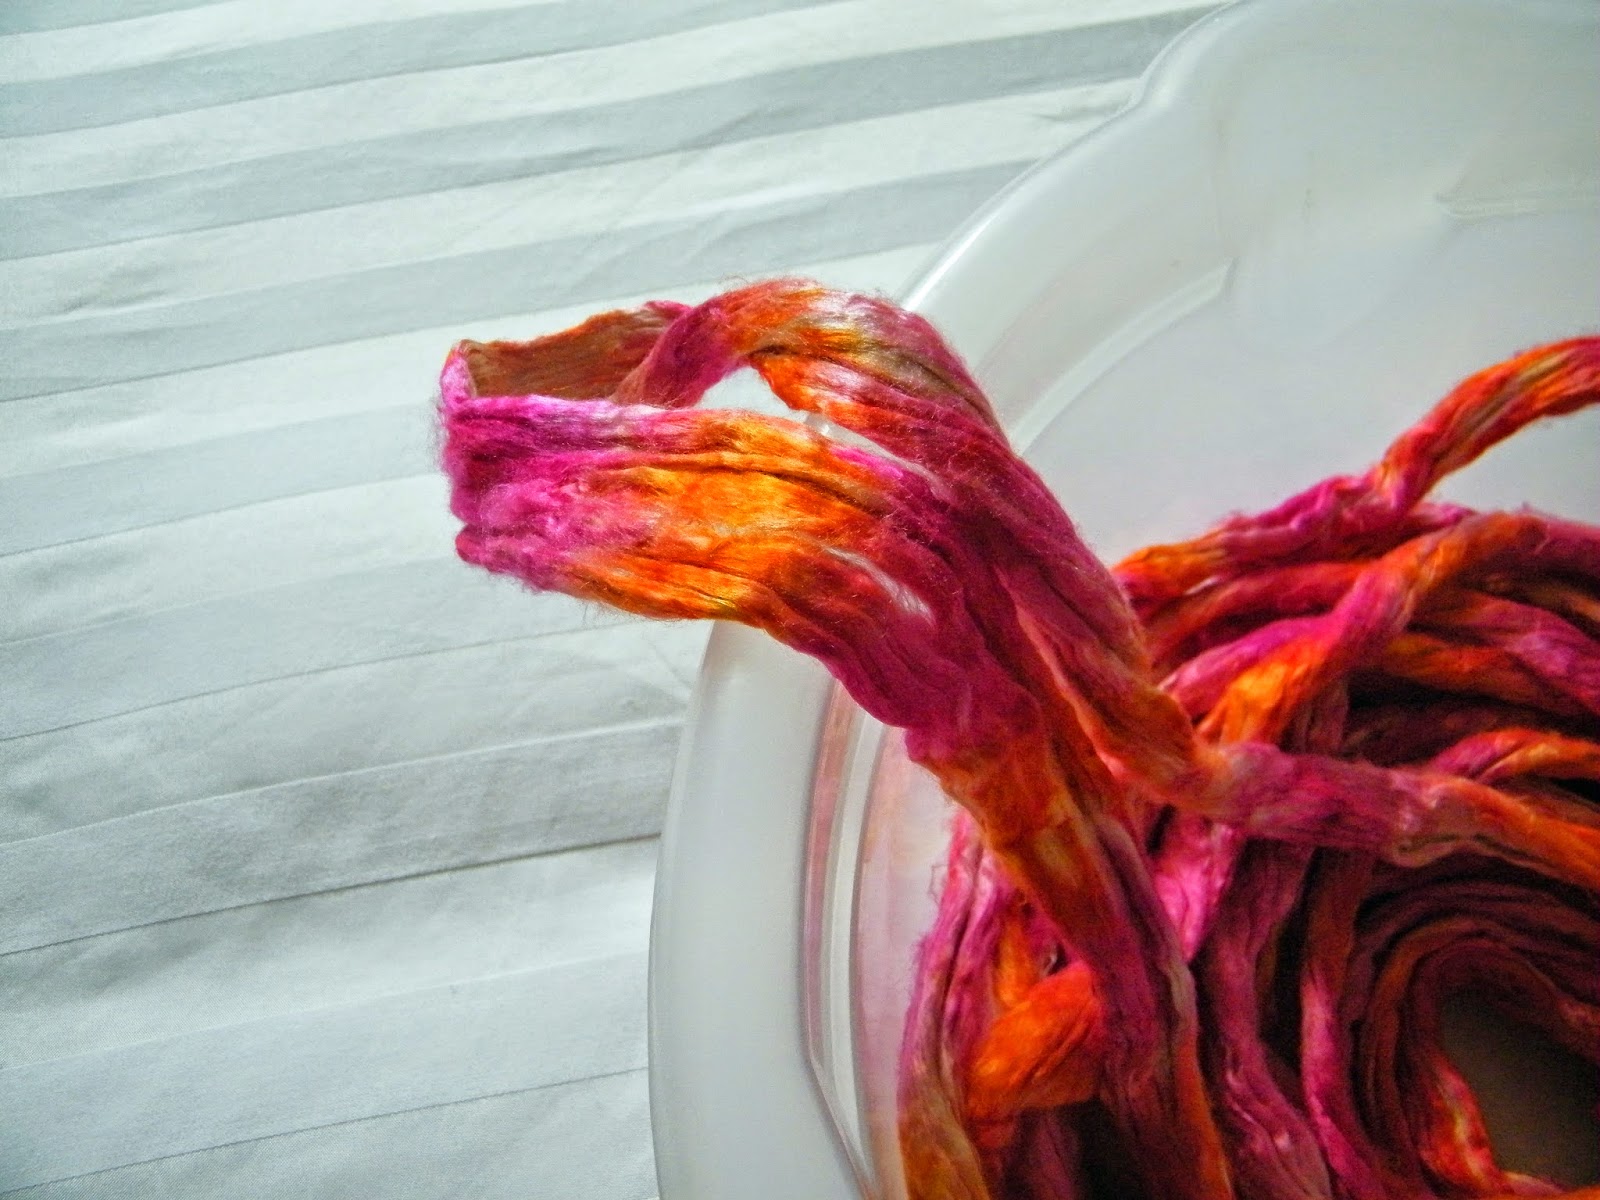
Tussah Silk Top which started calling to me right away!
Tucked into the box were four Gaywool dyes and the full range of dye sample cards, now I have everything I need to add some pizzaz to the silk! Although Gaywool dyes were developed specifically for wool, they work on any protein fibre ~ like mohair, silk and alpaca.
I measured four ounces of Tussah Silk top from the bag.  My first task is to get it saturated with water so I coiled the silk into a plastic tub to keep the silk fibres aligned and to make it easy to find the end.
There are yards and yards of silk so I needed to make a double layer, I used my laundry mesh bag between the layers just to keep it all from clumping together.
Because the silk wants to float, it needs to be weighed down and I used a couple of plastic containers filled with water to keep the silk under the water.
I left the silk overnight to make sure it was really saturated and the next day I squeezed out all of the excess water. I moved everything out to the garage and donning gloves I made up a solution of 4 cups of water with 1.4 ounces of urea and 3/4 cup of white vinegar and slipped the silk into the bowl.  I left it soak while I got my dyeing area set up in the garage.
I used this very light weight plastic sheeting to cover my work area.  I use a half sheet of plywood on sawhorses and it is a perfect height for me!
After about a 20 minute soak I squeezed out the silk (wearing gloves) and I laid it on the plastic in long ribbons.  I spent the time to flatten it out a bit to get as much surface area exposed as I could.
I measured out about 2 teaspoons of Cyclamen Gaywool dye and the same amount of Citrus into separate plastic cups.  (You see the prototype of the warping mill my husband is making me in the background on his workbench, but that's another story!)
Now I am ready to dye ~ really ~ that joke never gets old!  I sprinkled the dye in small alternating bands directly onto the still moist silk.  I purposely left some areas without dye so that I can get some colour blending and natural sections.
I used a little squeeze bottle with some of the urea, vinegar and water mixture from the soak to wet the dyes enough so that I could work the colour into the silk with my fingers.
I then turned the silk over and repeated the whole process on the other side.
Because I’m using a variation on the Rainbow dyeing method, all I have to do is to fold the plastic sheet from the table over the silk to encase it.
And roll it up!  Jobs a goodun’! 
 Just to be on the safe side I’ve put the silk roll into a plastic bowl to age for the next 24 hours.  I can't wait to see what it looks like tomorrow!

Friday, May 16, 2014

Weaving Tips and Tricks

Since I’m still plugging away on the tartan yardage, I thought I’d blog a bit about a few of the weaving tricks that I’ve used in the past few days to make weaving just that little bit easier.

After I did my first standard tie up on the tartan yardage I realized that my tension wasn’t all that great, so I decided to untie the warp from the breast beam and retie using the ‘lashing on method’ you can read about it here.
To hold the breast beam rod in place and to keep it level while I was lashing on I used a flat stick placed under the rod and resting on the beater bar.  These are the warping rods from my Louet Jane loom.
My friend Susan came for a visit awhile ago and while we were chatting about the tie up on the tartan yardage she spoke about the need to spread out the warp after the tie up and before weaving.  Just take a look the next time you tie on and see if there is an angle from the warp leaving the reed and where it attaches to the breast beam.
I almost always use a floating selvage thread; on the tartan I’m weaving right now I’ve used a smooth acrylic yarn to help me see the selvage changes and to help with draw in.  I’ve chosen a smooth yarn so that I can pull it out when I’ve finished weaving.  Rather than having just a mass of thread in my weighted film canister, I wind the thread around a sewing bobbin to keep it neat and tidy.
When I have several broken or missing warp threads that will hang close together off the back beam I wind the replacement thread onto the sewing bobbin and put it in a weighted film canister but before I attach it to the loom I slip the new thread through a small piece of plastic mesh or I use a piece of cardboard and cut slits in it and place the new warp thread into the slot. This will keep the hanging warp threads from twisting together.
When warping I prefer to use a heavy gauge bond paper rather than sticks.  I like the fact that I can pull it tight after each bout of winding and it keeps the warp threads beautifully in place, read more here.  As it comes off of the back beam I keep it off the floor by winding it back into a roll and holding it in place with clothes pins.
When I need to have unwoven areas for my fringes or between items I use 1 inch Venetian blind slates.  The photo above is Ngaires' newest shawl on the loom. These are firm enough to beat against when you first start and are easily to pull out as you go around the breast beam, but leave a few to ensure that the threads remain spread properly on the beam.
Ngaire was worried about draw in on this shawl so she pulled out this easy home made stretcher or temple.  It is simple to make with paper clips and works like a dream, you can get the instructions here